Disabling Automations
Salesforce automation is any code/logic that is run automatically when a record is created/updated/deleted. There are many type of such automations as listed below.
- Apex Trigger
- Validation Rule
- Workflow Rule
- Process Builder
- Flow
These automations are great to implement business logic but a hindrance if we want to dataload some data without having to run any of these automations. If it is a sandbox we could possibly disable these one by one and dataload but that is not an acceptable solution for production systems.
We need a mechanism skip these automations for one or more users (For ex., system user which is used to dataload). This page details one such framework that helps with disabling these automations at User level.
In all cases, we need to update our components to embed logic to short-cut the automation based on the user level configuration. While this page gives examples for each of these, it is responsibility of each Developer to ensure these short-cut logic is embedded either as new components is introduced or retroactively for past-items.
This page documents one such framework to disable automations, this is not only the way to implement such mechanism. Your org/team may have their own, and it is fine. Important thing is being consistent in approach and adopting this across all component.
New Field - One Time
- Create User object checkbox field
Disable_Automations__c. - Grant Read access to all profiles and edit access to
System Administratorprofile
If this field is checked, then it is intended that automations should be skipped for that user. Since changes to User record are tracked in Setup trial, you will have a record each time it is enabled/disabled for a User
Apex Trigger
Apex triggers needs bit of framework code which is one time change. After that, each trigger needs to be updated with same snippet of which bypasses the trigger.
Apex Trigger - One Time
- Create following main class
public without sharing class TriggerService {
    public static TriggerService instance = new TriggerService();
    private static Boolean disabledForUser = null;

    public Boolean isDisabled() {
        if (isDisabledForUser()) {
            System.debug('Triggers are disabled for user [' + UserInfo.getUsername() + ']');
            return true;
        }

        return false;
    }

    private Boolean isDisabledForUser() {
        if (disabledForUser == null) {
            User user = [select Disable_Automations__c from User where Id = :UserInfo.getUserId()];
            disabledForUser = user.Disable_Automations__c;
        }

        return disabledForUser;
    }
}
- Add following test class
tba;
Apex Trigger - For Each
Add following piece of code each of your Triggers
if (TriggerService.instance.isDisabled()) {
  return;
}
For ex., your trigger class should look like this after adding the snippet
trigger OpportunityTrigger on Opportunity (before insert, after insert, before update, after update, before delete , after delete, after undelete) {
  if (TriggerService.instance.isDisabled()) {
    return;
  }

  // other trigger logic
}
There will be one SOQL execution for each Transaction (irrespective of number of triggers are run in that transaction), this will count towards your limit. If you are already in the verge of reaching the SOQL limit, then you can consider making use of Platform Cache to cache the status for each user, which can be cached for upto 2 days.
Validation Rule - For Each
Add below logic as first operator in your validation rule.
AND(NOT($User.Disable_Automations__c), <exiting val rule>)
For ex., here is sample Validation before and after adding the short-cut logic.
Before
AND(
  OR(
    ISPICKVAL(Stage__c, "Expired"),
    ISPICKVAL(Stage__c, "Inactive"),
    ISPICKVAL(Stage__c, "Replaced"),
    ISPICKVAL(Stage__c, "Voided"),
    ISPICKVAL(Stage__c, "Withdrawn")
  ),
  ISPICKVAL(Actions__c, "On Hold")
);
After
AND(
  NOT($User.Disable_Automations__c),
  AND(
    OR(
      ISPICKVAL(Stage__c, "Expired"),
      ISPICKVAL(Stage__c, "Inactive"),
      ISPICKVAL(Stage__c, "Replaced"),
      ISPICKVAL(Stage__c, "Voided"),
      ISPICKVAL(Stage__c, "Withdrawn")
    ),
    ISPICKVAL(Actions__c, "On Hold")
  )
);
Workflow Rule - For Each
Workflows have three different ways of specifying the conditional logic.
- Filters without Filter Logic
- Filters with Filter Logic
- Formula
Each of these needs to be addressed little differently.
Workflow Rule - Filters without Filter Logic
Add a new condition which checks User flag along with other conditions.
Before

After

Workflow Rule - Filters with Filter Logic
Before

After

Workflow Rule - Formula
If it is formula, enclose the whole formula with following construct
AND(NOT($User.Disable_Automations__c), <exiting logic>)
Process Builder
Process builder needs two aspects to be able to bypass it. A criteria which checks if current user has automations disabled and dummy action which does nothing. To facilitate the dummy action, we created apex class with invocable apex method called DoNothingAction which we can use as Process Builder Action.
Select the Process Builder/Version that you want to edit. If it has been activated prior, you can make a copy of it and follow these steps to add bypass logic.
Process Builder - One Time
- Create Following main class (DoNothingAction.cls)
public class DoNothingAction {
   	@InvocableMethod
    public static void doNothing() {
        // As name indicates this method is used in Workflows to bypass automations.
        // This method must do nothing.
    }
}
- And its corresponding test class (DoNothingActionTest.cls)
@Istest
public class DoNothingActionTest {

  @IsTest
  public static void doNothingTest() {
    DoNothingAction.doNothing();
  }

}
- Grant access to
DoNothingActionapex class to all profiles
Process Builder - For Each
Go through the steps and add a decision which checks if it is disabled
for current user and if it is executes DoNothigAction
-
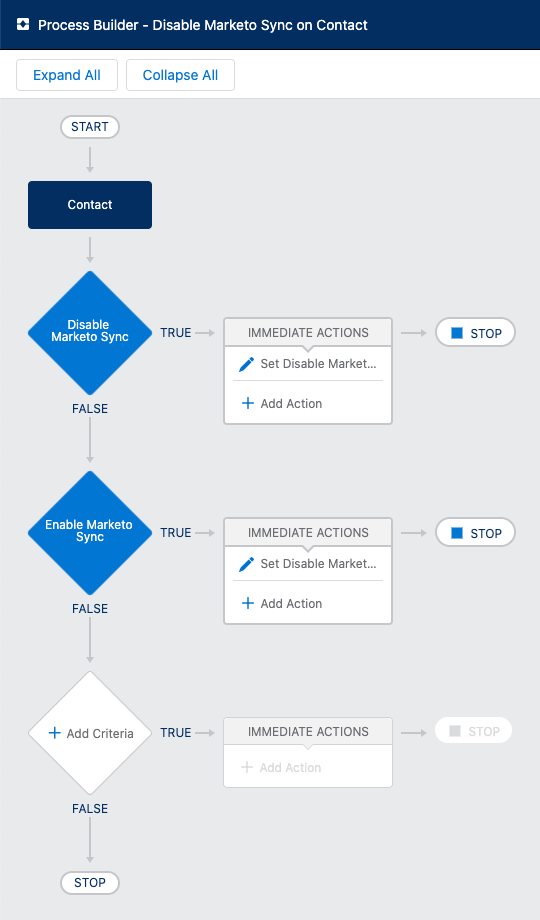
Let’s say we want to change below process builder.
-
Add a new criteria at the bottom and set Condition as Formula as
$User.Disable_Automations__c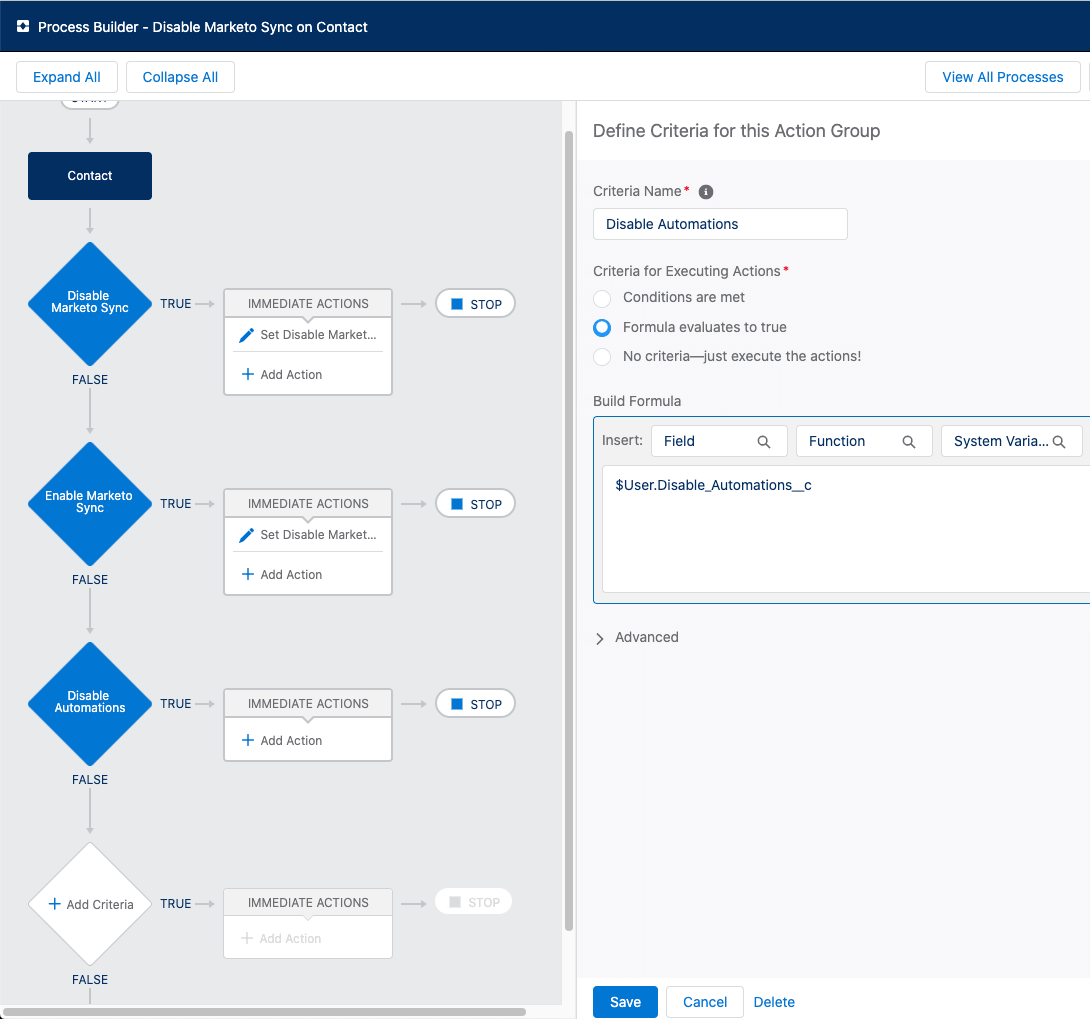
-
Add Apex Action to that criteria and select Apex class
DoNothingAction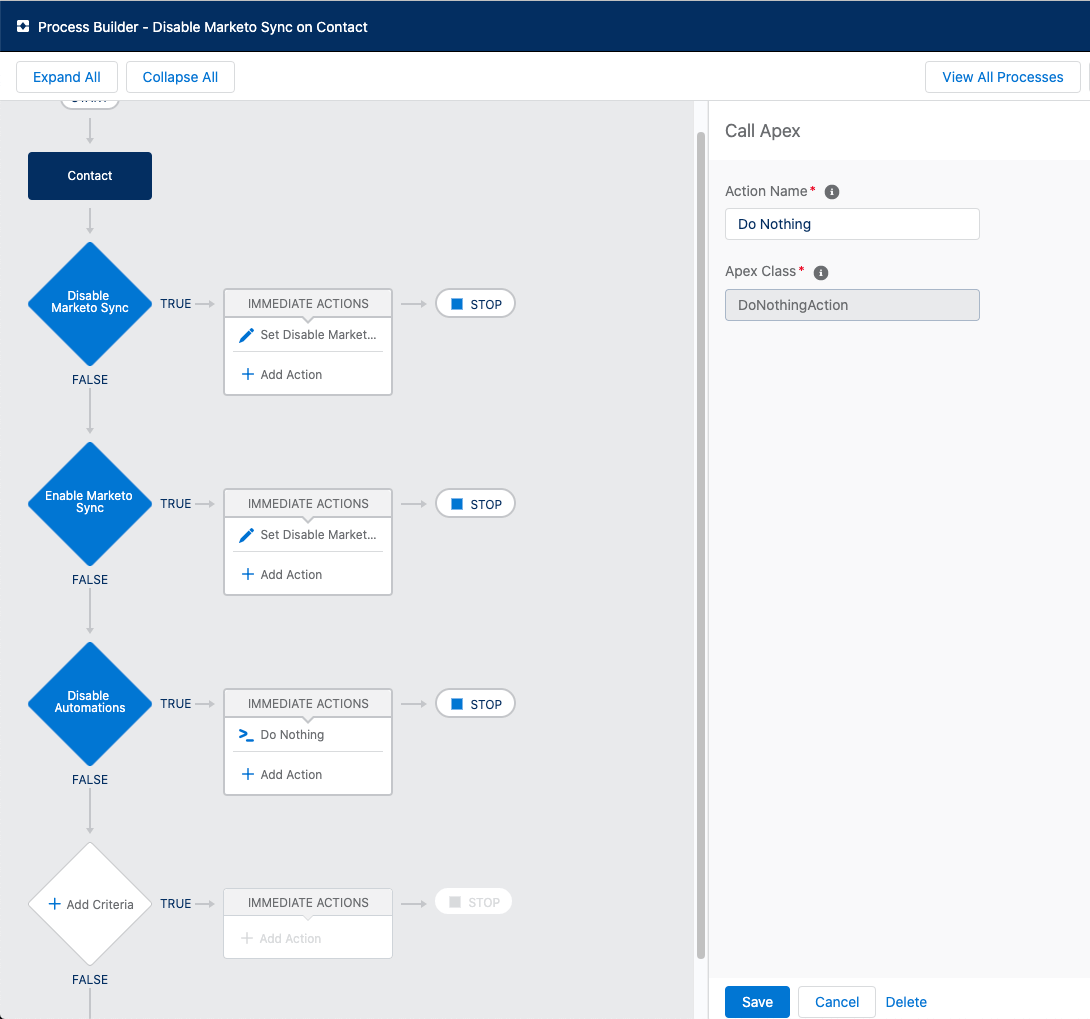
-
Drag the criteria and drop it as First in the list.
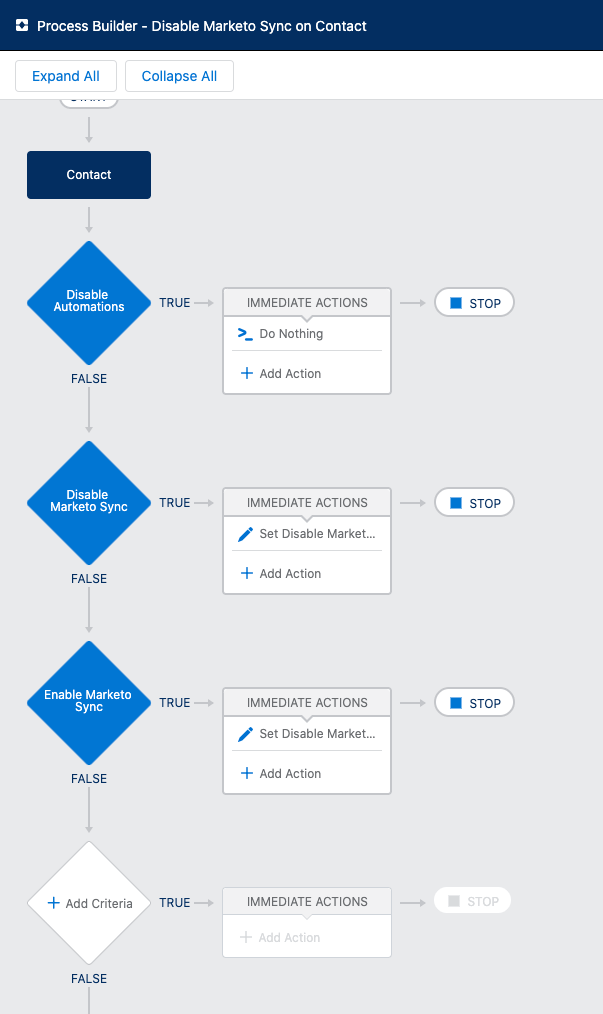
-
That’s it, now process would be terminated immediately soon after it was started.
Flows - For Each
We need to update only auto-launched flows as Screen Flows are usually manually invoked. Follow these steps to edit one such automated-flow.
-
Open the Flow you want to edit (in this, we are using an example flow we tested for this demo)
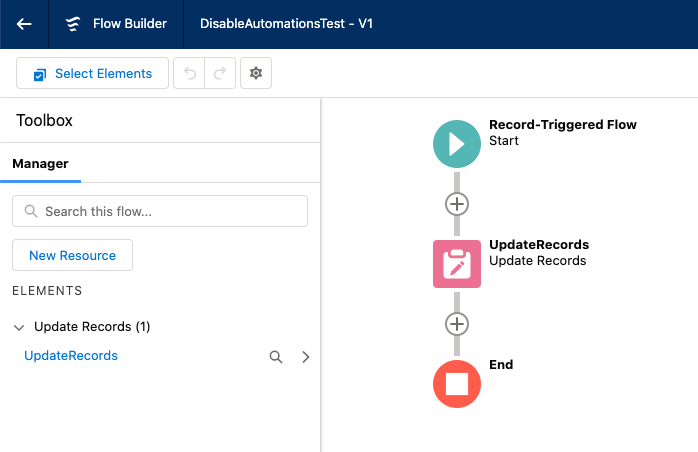
-
Add Decision Element just after Start and Configure to check for
User.Disable_Automations__cfield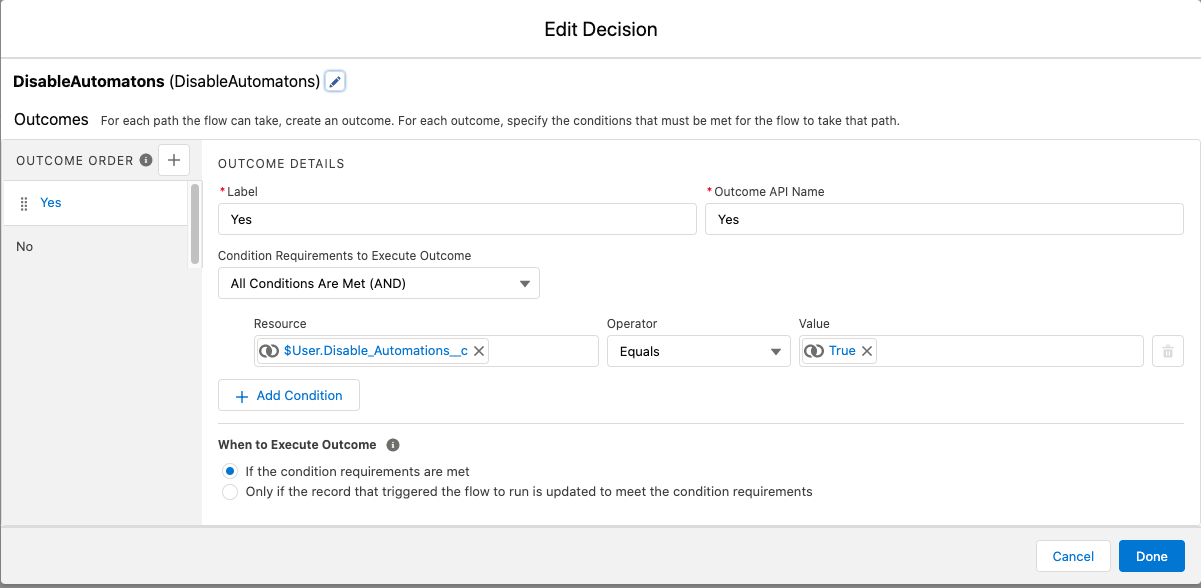
-
After configuring the above example flow should look like this
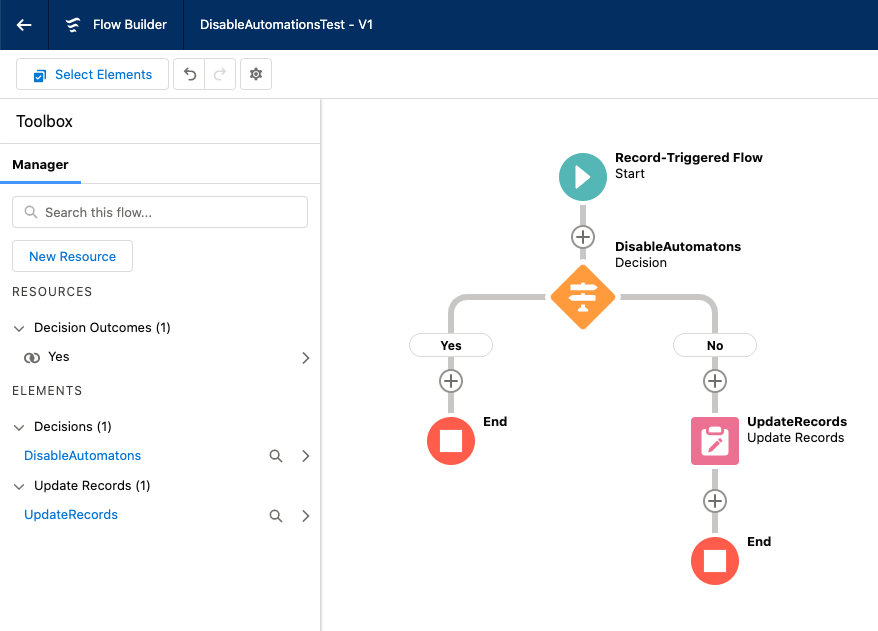
-
That’s it, now flow would be terminated immediately soon after it was started.