Records Monitor
Records Monitor helps you continuously track record changes across one or more objects or specific record IDs, in a single live view.
Records Monitor data is in-memory for the active page session. If you close or refresh the page, collected changes are cleared. Use exports as needed for offline reference.
How to Launch
- Open Brobench.
- Go to
App Menu -> Modules -> Records Monitor. - Click
Requestto define what should be monitored.
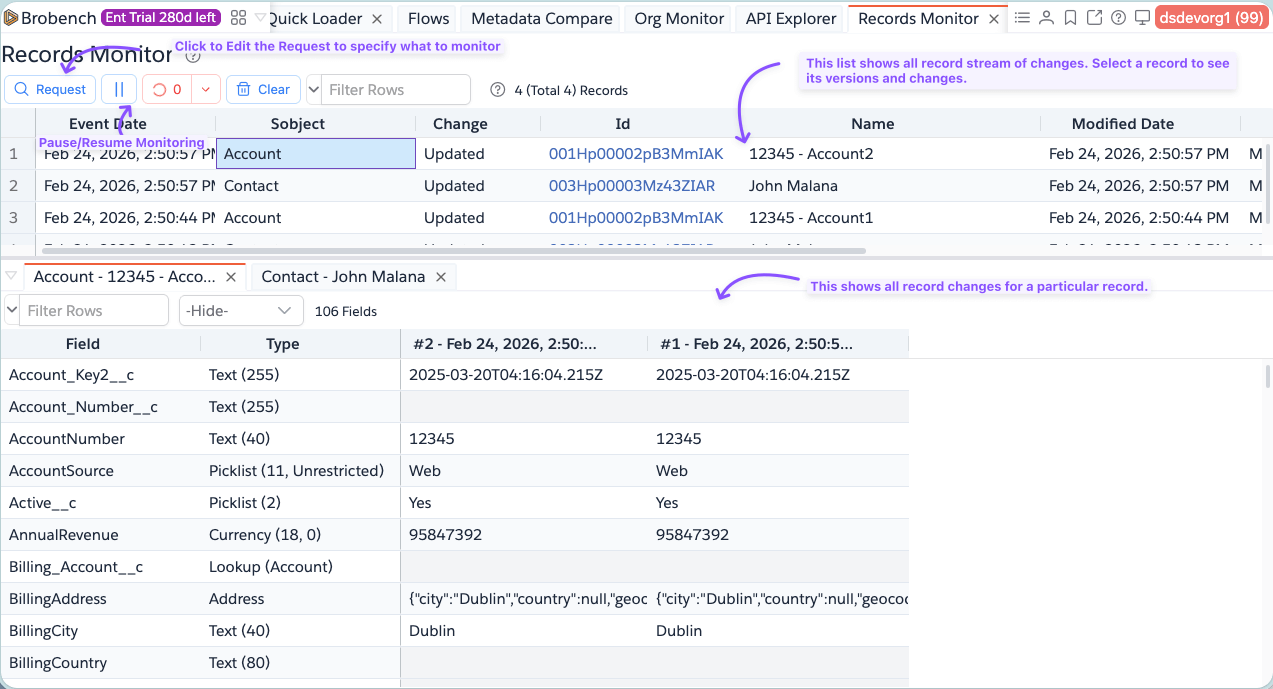
Overview
Records Monitor has two main areas:
- Top grid: live stream of matched record change events.
- Bottom tabs: version details for selected records.
Toolbar actions:
Request: define monitoring scope (objects/records/users/options).Auto Refresh: poll changes at intervals (5s to 600s), with pause/resume support.Clear: clear current in-memory changes and close opened version tabs.
Records Monitor Request
Click Request to open the configuration dialog. In this dialog, you will configure the Objects to be monitored and
other options related to monitoring.
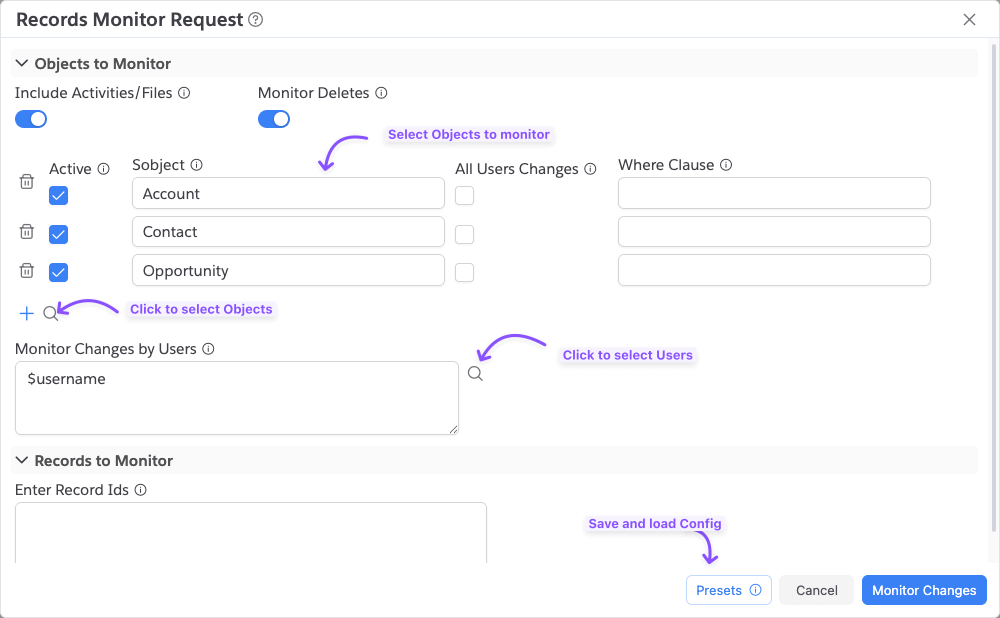
Objects to Monitor
Use the object list to define which objects are monitored.
For each row:
Active: only active rows are monitored.Sobject: object API name (you can use Object Picker).All Users Changes: for that object, ignore user filters and include all users.Where Clause: optional extra filter (withoutWHEREkeyword).
Options:
Include Activities/Files: auto-includesEvent,Task,ContentDocument,ContentDocumentVersion, andAttachmentwhen available in the org.Monitor Deletes: includes delete events for active objects when supported.
You can click on the Plus icon to add a new empty row where you can specify object name. Or you can click on the
Search icon and select or more objects.
Monitor Changes by Users
Provide usernames (one per line) to restrict monitoring to those users.
- You can use
$usernameto dynamically use the current connection username. - If
All Users Changesis enabled for a row, that row ignores this user filter.
Records to Monitor
You can provide Record IDs directly (one per line). If specified, these Records will be monitoring in addition to any Objects specified. If you don't specify the Objects but only Record Ids, then app will monitor only these Records.
Presets
Use Presets in the request dialog to save and reload request configurations. This way, you don't have to keep entering
same configuration.

View Changes
Click on a Record in the top list to see the list of changes for that Record. Record versions are shown in the bottom panel. You can use the filter to hide some of the non-relevant changes like Unchanged fields or system/readonly fields etc.,

Monitoring Behavior
- Monitoring starts after you submit the request.
- Auto-refresh polls for changes in the selected interval. You can change the auto-poll interval.
- Changes are de-duplicated by object + record + event timestamp.
- New rows are shown in descending event time.
- Selecting a row opens a details tab with record versions.
Understanding Change Types
The Change column can show:
Created: record was created in the monitored time window.Updated: existing record was updated.Deleted: record was deleted (whenMonitor Deletesis enabled and supported).
The grid also includes event metadata such as Event Date, Object, Id, Name, Created/Modified details and users.
Notes
- At least one active object or at least one record ID is required.
- For object-based polling, query pulls are capped per request cycle by backend query limits.
- Some objects may be skipped automatically if they are not queryable/replicable in the org.