Quick Loader
Quick Loader (Quick as in less configuration) is used to import data from various file formats into Salesforce Org with support for flexible field mapping, parsing different date formats, and more.
In the next few versions, Brobench will also support full-featured Dataloader with support for saved profiles, multiple runs, etc. Go through the video guide below for an overview of Quick Loader.
Open the Quick Loader from the Modules Menu -> Quick Loader. The screenshot below shows the various aspects of the Quick Loader UI.

Steps
Here are the steps you need to follow to import the data.
- Select the input file to be loaded
- Select the Object where to load the data into
- Select the Action (Insert, Update, Upsert, Delete, etc.)
- Define or review the Field mapping
- Import the data
The sections below explain each step in detail.
Select Input File
Click on the Open Input File button to select the file to be imported. Upon clicking, the app shows the dialog below.
You
can enter the data directly
into the Input Text box, or you can select the file from your local drive. Keep the following in mind with regard to
the input file.
- App supports loading CSV/TSV/JSON/Excel (.xlsx) files
- App supports pasting text in CSV/TSV/JSON formats (Note that when you select cells in Google Sheets/Excel/Numbers and copy, data is copied in TSV format)
- If you select an Excel (.xlsx) file, the app will show the list of sheets in the file. Select the sheet to be imported.
- We have tested the app to load data up to a million records, but your mileage may vary depending on your system resources
About JSON files, the app understands and reads the shapes below. In all cases, the first record dictates the field
names.
So make sure the first record
has all fields. If some fields don't have data, set them as null
- Array of Records.
[
  {
    "FirstName": "John",
    "LastName": "Doe"
  },
  {
    "FirstName": "Jane",
    "LastName": "Doe"
  }
]
- Object with
recordsfield
{
  "records": [
    {
      "FirstName": "John",
      "LastName": "Doe"
    },
    {
      "FirstName": "Jane",
      "LastName": "Doe"
    }
  ]
}
Select the Object
Next up select the Object to load the data into. App will show all Objects that can be data-loaded into, including Tooling Objects, Custom Settings and Custom Metadata.
- Once you select an Object, that Object will be shown at the top of the list for easy selection next time
- When you select an Input File, it contains a field named
Idthen value of that field will be used to identify the Object.
Select Action
Next up, select the Action (Insert, Update, Upsert, Delete or Delete Hard).
- Some objects support only specific Actions, and in such cases, only those will be shown. For example, Custom Metadata supports only Upsert and Delete operations.
- If select input file has
Idfield present, then Action is set asUpdateotherwise will be set asInsert
If you select Upsert action, then Upsert Field will be shown, and you must select one of the available External Id
fields for that object. For
Custom Metadata, Upsert Field must be DeveloperName
Define Field Mapping
Field Mapping tells Quick Loader how to map the columns in your input file to the fields on the target Salesforce object. Quick Loader auto-maps matching fields when you select a file and object. Click Field Mapping to review or adjust the mappings. See the Field Mapping page for full details including date formats, boolean handling, and default values.
Input Data Grid
When you select an input file, the app will load the data into the Input Data Grid. You can use the grid to preview the data and make some minor changes.
App Fields
App adds _Status, _Error and _Id fields to the input data. These fields are used to track the status of the
record, show any error that arises
during the import, or show the Id of the record (which is critical if you are inserting records). Note that if your
input file contains these
fields, then they will be used as is which helps you to resume the import at a different time.
Remove Records/Fields
Once data is loaded, you can remove some records or fields from the input data. To remove one or more records, select
the records, right-click on the
grid and select Remove Selected Records. To remove one or more fields, select one or more fields, right-click on the
grid and select
Remove Selected Fields.
Edit Records
If you want to make any changes either before you start loading or to correct any errors that occurred during the import, you can edit the records.
To edit a call, double-click on it and enter new data.
To make bulk changes, select all cells you want to change, right-click on the grid and select Set -> <option>.
Save Options
Quick Loader supports configurable Save Options to control how records are written to Salesforce.
How to Open Save Options
You can open Save Options in two places:
- Click
Save Optionsin the Quick Loader toolbar. - Click
Run Importand expandSave Optionsin the confirmation dialog.
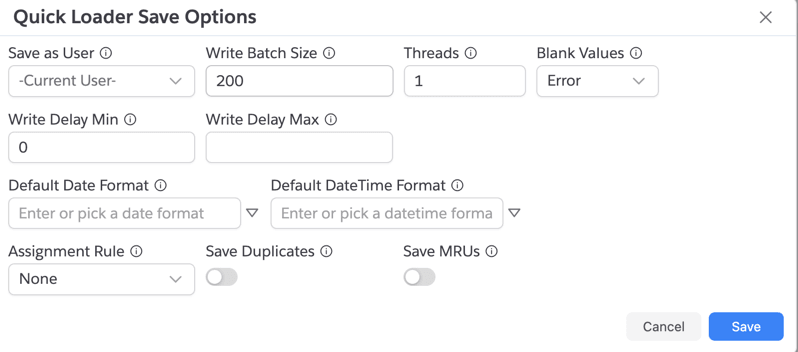
Available Options
| Option | Description |
|---|---|
| Save as User | Run save using another connection from the same org. |
| Write Batch Size | Number of records per save API call. |
| Threads | Number of parallel save API calls. |
| Blank Values | For Update/Upsert, controls handling of blank source values: Error, Skip, or Save (nullify in Salesforce). |
| Write Delay Min | Minimum delay (ms) between save batches. |
| Write Delay Max | Optional maximum delay (ms). If set, app uses randomized delay between Min and Max per batch. |
| Default Date Format | If your input contains dates in non-API format (that is yyyy-MM-dd/2027-12-30), then you can specify the format here. You can overwrite this format in per-field mapping level as well. |
| Default DateTime Format | Similar to Date format above, this is for Date/Time |
| Assignment Rule | Uses Salesforce assignment rule behavior (None or Default) for supported objects. |
| Save Duplicates | Allows save even when duplicate rules would otherwise block. |
| Save MRUs | Adds saved records to Salesforce Recently Used list. |
Notes
Blank Valuesis especially important forUpdateandUpsert.- Delay and batch settings are useful to reduce API pressure for large imports.
- You can use
Pilotrows with Save Options to safely test first N records before full run.
Create Backup
Before running an Update, Upsert, Delete, or Delete Hard operation, use Create Backup to download the current Salesforce records to a CSV file as a safety net. See the Create Backup page for full details.
Run Import
Once you are done with all the above steps, click on the Run Import button. The app will show the dialog below to
confirm
the action and proceeds to
load the data.
Checking Status
Once import is completed, _Status field will get be updated with the status of the record. You can also check the
status of the import in the
Datagird toolbar status.
Error Handling
If there are any errors, review the errors and correct them if necessary and then click on the Run Import (Retry)
button. It will retry only the
Error records and skip the rest. Status will be updated again with the latest import status.
Export the Data
You can export the Input Datagrid into various formats supported by the Datagrid including Google Sheets. Check out Datagrid Export feature for more info.
If you preserve the _Status, _Id fields, resume the dataload at a later time.
Reset
You can click on the Reset button in the toolbar to reset all config/data or just import status.

- Reset All: Resets everything in the Quick Loader and blanks it out, including config and data
- Reset Import Status of All Records: Resets only the Import Status of all records so that you can run import again. By default, Quick Loader will not import the records which are successfully imported to avoid duplicates or other issues. By resetting the import status, it will allow you to run the import again.
- Reset Import Status of Selected Records: Resets only the Import Status of only selected records.
Presets
Presets save your Quick Loader configuration — object, action, field mappings, default values, and save options — so you can reapply them instantly for recurring imports. See the Presets page for details.
Global Action
Quick Loader has a shortcut in the Brobench global toolbar. Click the Import icon to open Quick Loader with your current clipboard contents loaded as the input — no need to open a file or paste manually.

This is handy when you have copied data from Google Sheets, Excel, or another source and want to load it immediately.