Role Manager
The Role Manager module allows you to visualize the Role Hierarchy, manage Roles, and manage User assignments. Go through this handy guide to know how to use it.
You can access the Roles module via Modules Menu -> Role Manager. See Modules Menu for more
info.
When you open the module, it shows the page as shown in the screenshot below. The screenshot below shows the main layout of the page and important controls.
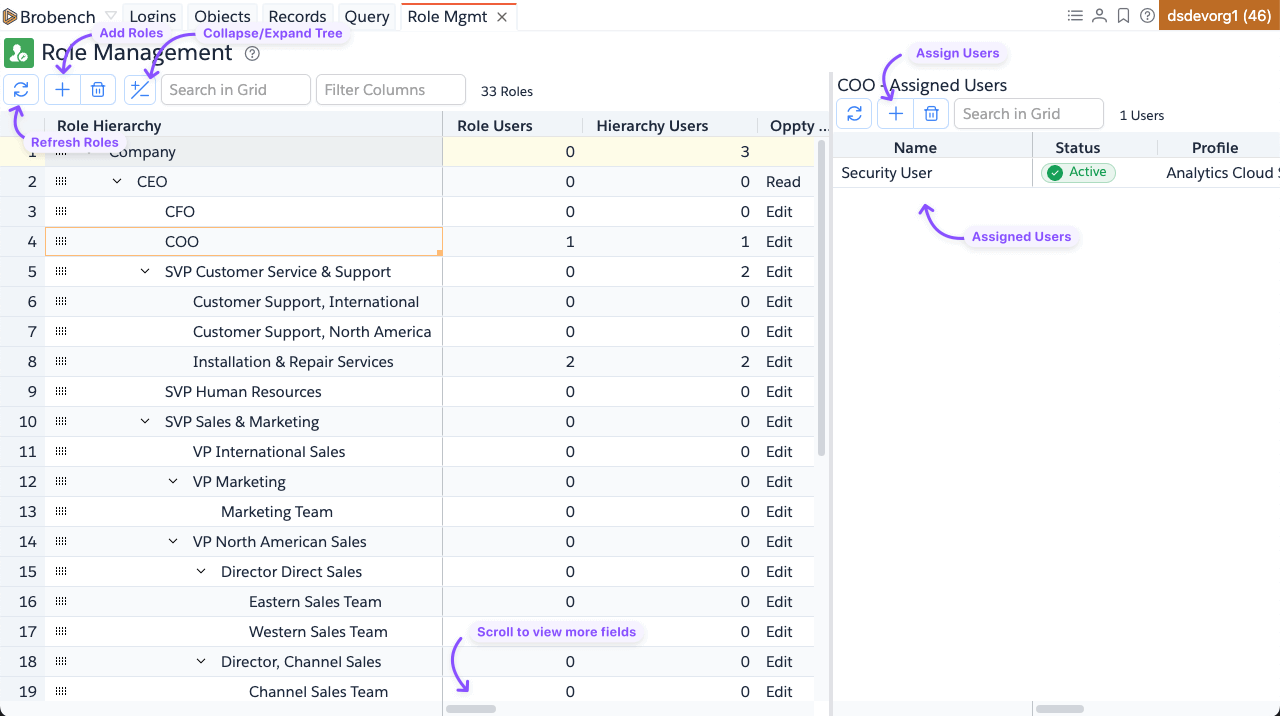
Explore Roles
You can do the following things to explore the Roles.
- You can expand or collapse the tree by clicking on the
+/-icon. - Search for a specific role by entering a search term in the
Search in Gridsearch box - You can filter one or more columns by entering a search term in the
Filter Columnssearch box - Click on a Role to see assigned users of that Role
- You can export the Role hierarchy tree
- Role
Companyis a virtual Role created to represent the Company itself. It is not a real Role record hence you cannot assign users to it or - App shows only Internal Roles (
PortalType = 'None') Role Userscolumn shows the number of users assigned to that RoleHierarchy Userscolumn shows the number of users assigned to the Role and its subordinates- App includes only Active users in the count calculations due to performance considerations
Manage Roles
The app allows you to make changes to the Role or hierarchy via various means including drag-and-drop of the roles.
Add Roles
To Add a new Role or multiple Roles, select the parent Role and click on the Plus icon in the toolbar, or you can also
click
on the Add Role from the right-click context menu in the Roles datagrid. The app will show the dialog below.

Enter the Role details and click Save button. Once the new Role is saved, the dialog will close and the Role hierarchy
will be refreshed with the
new Role.
Opportunity/Contact/Case access fields are shown based on the Org Wide Default settings for that object. It should mimic the options that are shown in Salesforce UI.
Add Multiple Roles
You can add multiple Roles and hierarchy in bulk at a time by selecting Add Multiple option. When you select it, the
app will show the dialog below.
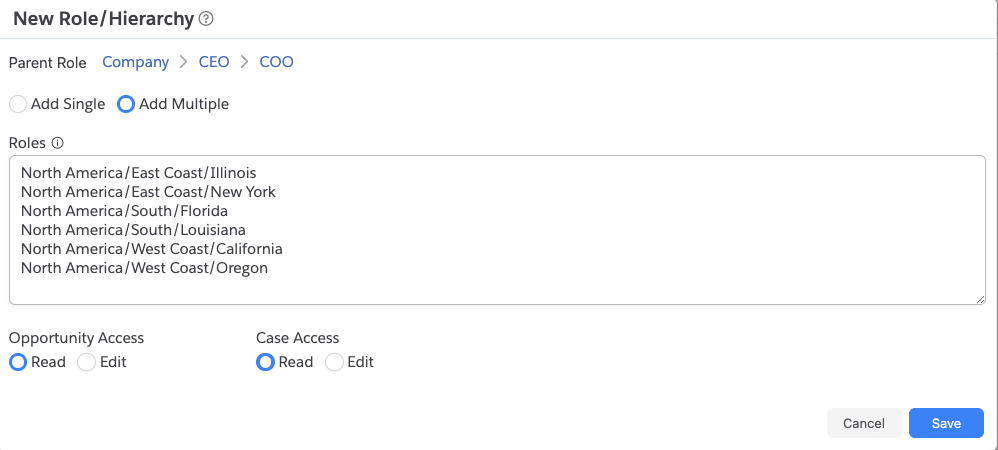
Enter each Role name in a new line. You can include the hierarchy by separating the hierarchy segments with / char.
DeveloperName will be derived
from the entered Role Name. If there exists a Role with matching Name, then that role will be reused without adding new.
For example, let's say you want to create the hierarchy below
Company
└── North America
    ├── East Coast
    │   ├── Illinois
    │   └── New York
    ├── South
    │   ├── Florida
    │   └── Louisiana
    └── West Coast
        ├── California
        └── Oregon
then enter the text below in the Roles text area.
North America/East Coast/Illinois
North America/East Coast/New York
North America/South/Florida
North America/South/Louisiana
North America/West Coast/California
North America/West Coast/Oregon
Once you enter the Roles text, click on Save button. App will create all necessary Roles to establish the requested
hierarchy.
Edit Roles
To edit a Role, select the Role and click on the Edit Role from the Datagrid right-click context menu. The dialog
below will be shown. Make
necessary changes and click Save

Move Roles
You can move around Roles to build the hierarchy you’re looking for. There are two ways to move Roles. 1. By dragging
the Role to new Parent 2. By
selecting one or more Roles and clicking Move Roles Here menu item.
Drag-and-drop Roles
Datagrid row has a small drag handle in the Hierarchy column. Click and hold that icon and drag it to the new parent Role and drop it. The app will prompt you to confirm the move and then performs the move.
Select and Move Roles
While Drag-and-drop Role allows you to easily move Roles, it is limited to a single Role at a time. If you’re looking to move multiple Roles, maybe from different locations, this option is best suited for you.
Select all the Roles you want to move, right-click on any of the selected Roles and select Select Roles to Move menu
item. Now go to the new parent Role,
right-click and select Move <n> Roles Here menu item. The app will prompt you to confirm the move and then performs the
move.
Delete Roles
To delete one or more Roles, select the Roles and click Delete Roles from the Datagrid right-click context menu. The app will
show you the confirmation
dialog.

Review the confirmation message carefully and click Yes, Delete button to continue to delete the roles. Note that
deleting roles is a multistep
process. App will first unassign users from the Role being deleted, then it will update all roles to set ParentRoleId to
null and then it will
delete the Roles.
If you want to keep the children of a Role, then move the Roles to another parent Role before deleting.
View Assigned Users
In the Role Datagrid, there are two columns that show the number of Users assigned to the Role. Role Users column
shows the number of Users assigned
to that Role directly. Hierarchy Users column shows the number of Users assigned to the Role and its subordinates.
To see the actual list of Users assigned to a Role, click on a Role and the right-side panel will show the list of Users.
To assign and unassign Users, go through the next section.
Manage Users
You can Assign/Remove and Move users from one role to another, all are done from Assigned Users side panel.
Assign Users
Click on the Plus icon in the toolbar or select Assign User from the right-click context menu in the Users Datagrid. The app
will show the dialog below.
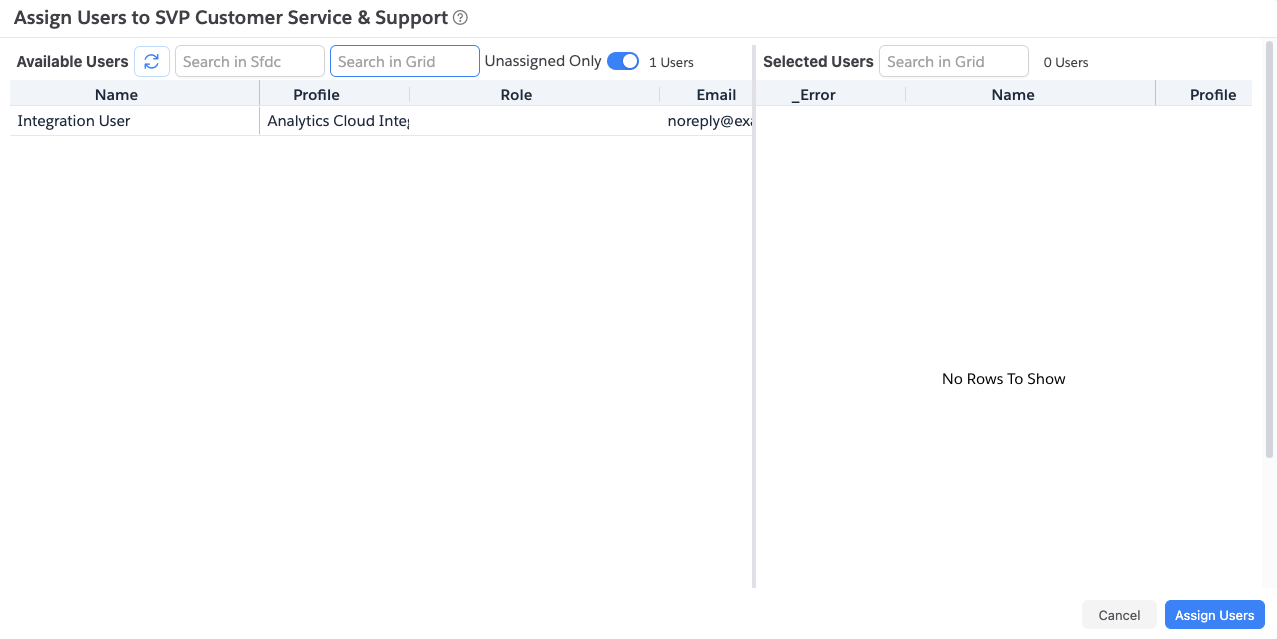
- You can’t assign to root
CompanyRole as that is a virtual Role created to represent your company - App searches for users matching this criteria, basically shows active internal users
IsActive = true and (not Profile.UserLicense.Name like '%Chatter%') and (not Profile.UserLicense.Name like '%Partner%') and (not Profile.UserLicense.Name like '%Customer%') and (not Profile.UserLicense.Name like '%Guest%') - To include already assigned Users in the search, uncheck
Unassigned Onlyswitch - The search keyword you enter, searches
Name,EmailandUsernamefields. - User search limits to 1000 Users ordered by Name. If the user you’re looking for is not shown, enter a more specific search term.
When you open the dialog, the app shows active and unassigned users. You can also search for a specific user in SFDC or
search for users in the grid.
Double-click on a row to assign, or highlight a set of Users and select Select Users from the context menu.
The list of Users selected to assign is shown on the right-side panel. You can remove users from that in the same way,
by double-clicking a record or
choose Unselect Users from the context menu.
Once you’re happy with selected users, click on Assign Users. The app will make the necessary changes, close the dialog, and
the Roles list will refresh with
the updated user count.
Remove Users
To remove assigned Users, follow these steps.
- Highlight one or more users
- Click
Remove Usersfrom the context menu. - App will prompt you to confirm and once confirmed, will remove the users and refresh the Roles list to reflect the new User count.
Move Users
You can also move users around using these steps.
- Select a Role from the left grid which shows its assigned Users in the right grid
- Highlight one or more users who you want to move and click
Select Users to Movefrom the context menu. - Select the target role where you want to move the users to.
- Select
Move <n> Users Herefrom the Roles context menu or Users context menu. - App will prompt you to confirm and once confirmed, will move the users and refresh the Roles list to reflect the new User count.
Export Roles
Exporting Hierarchy
It can be handy to export your company Role hierarchy to share, analyze, or auditing purposes.
Copy Other -> Copy Hierarchy as Treecopies the Role Tree to clipboardCopy Other -> Copy Hierarchy as Segmentscopies the Role Hierarchy as path segments to clipboardExport Other -> Export Hierarchy as Treeexports the Role TreeExport Other -> Export Hierarchy as Segmentsexports the Role Hierarchy as path segments
Here is an example of Hierarchy Tree output
Company
└── North America
    ├── East Coast
    │   ├── Illinois
    │   └── New York
    ├── South
    │   ├── Florida
    │   └── Louisiana
    └── West Coast
        ├── California
        └── Oregon
Here is an example of Hierarchy Segments output
North America
North America/East Coast
North America/East Coast/Illinois
North America/East Coast/New York
North America/South
North America/South/Florida
North America/South/Louisiana
North America/West Coast
North America/West Coast/California
North America/West Coast/Oregon
Exporting Roles List
As with any datagrid, you can export the Roles list using the Datagrid export menu.