Task Type - Sfdc Data Mask
Overview
Sfdc Data Mask task is a specialized task which can be used to mask the data that is in Salesforce. This is typically applicable when you create a full or partial copy sandboxes which copies complete or some of production data into sanboxes and you would want to mask that data to ensure security/privacy/legal compliance.
Noteworthy Capabilities
Here are some noteworthy capabilities of this task.
- Mask one or more objects in serial or parallel mode
- Incremental or Full mask for each Run
- Mask all or specified fields
- Lots of Mask Types, including type to generate Fake Data
- Disable Automations before mask and enable after
- Capability to mask all data types including Attachments
- Retry errors to ensure all records are masked
- Combine with other Realtask supported tasks to satisfy all masking needs including deleting records
- Support Bulk Api for faster masking
- Mask in split range to be able to mask Objects even with 100s millions of records
- Preview records to ensure correct masking configuration
Manage Tasks
To be able to mask add a Task to existing Job and select tye Task type as Sfdc Data Mask. To edit an existing task,
click on the
pencil icon next to corresponding Task. Once task dialog is shown, select the Salesforrce connection that you want
to Mask and click on Data Mask Config which should show another dialog where you can configure the mask details.
See below section for configuration details.
Job can have any number of Sfdc Data Mask tasks. Each such task can be configured to mask one or more objects, so one
mask task
should be sufficient in most of the cases.
Configuration

Global Settings
Global Options defines the settings that apply for all Objects and data masking process as a whole. Note that if there are multiple Sfdc Data Mask tasks in a Job, then each such task will have its own Global Settings.
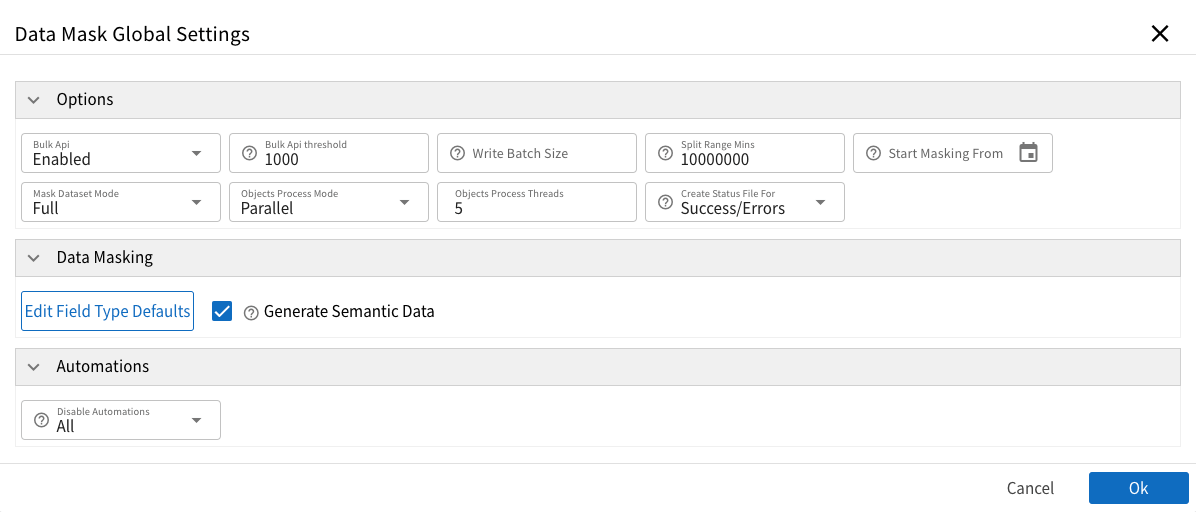
To access global setting, click on the Data Mask Global Settings button in the configuration dialog.
Global Settings - Options
| Field | Type | Default | Description |
|---|---|---|---|
| Bulk Api | Picklist | Default | Controls if Bulk Api is enabled or not. If it is Default, then global settings will be applied. |
| Bulk Api Threshold | Numberr | 10000 | Indicates number of records after which bulk api should be used. For ex., if it is 10000, then bulk api will be used if system needs to process 10000 or more records in in a batch. |
| Write Batch Size | Number | 200 | Number of records to include in one batch api save request. This is applicable only for Batch Api |
| Split Range Mins | Number | 5040 | See below section Split Range Mins for more info |
| Start Masking From | DateTime | If you want masking to start from particular datetime, you can specify the datetime. This setting can be overwritten at Object level. | |
| Mask Dataset Mode | Picklist | Incremental | Indicates how to pick records for masking. See Mask Dataset Mode for more info. |
| Objects Process Mode | Picklist | Parallel | Indicates how Objects are processed, Parallel or Serial |
| Objects Process Threads | Number | 5 | Applicable of Objects Process Mode = Parallel. Indicates how many objects are processed at a time. |
| Create Status File For | Picklist | 'Errors' | Indicates when to create status file. See Create Status File For for more info. |
Global Settings - Data Masking
This section allows you to configure data masking properties by field type.
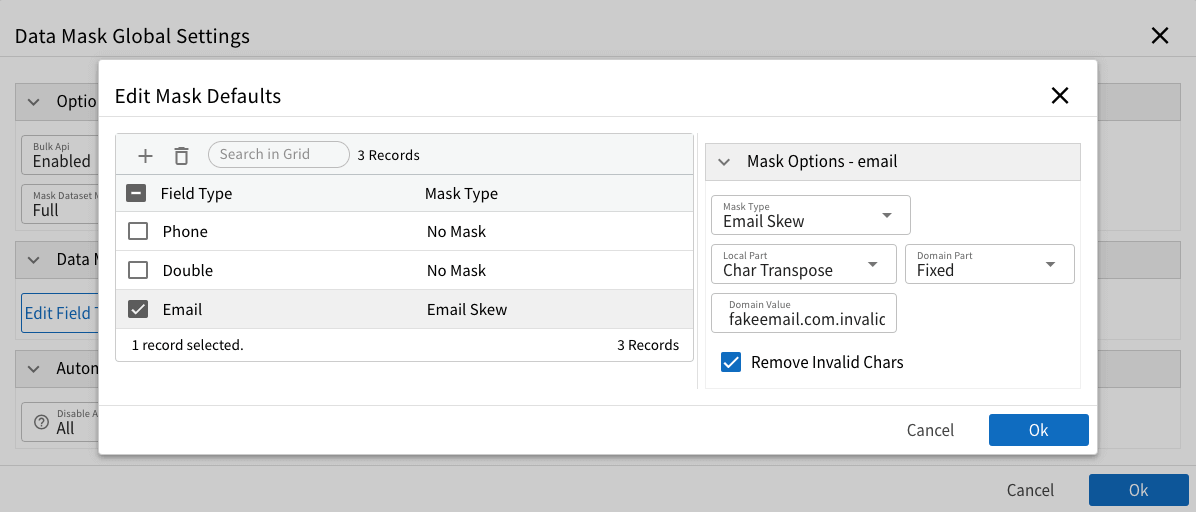
Global Settings - Edit Field Type Defaults
Click on the button to open dialog where you can select field type and specify defaults properties. Click on + icon to
select a field type
and click on that item in the data grid to show its properties. If you select No Mask, then by default that type of
field will not be masked unless
those fields are specified in the Fields list.
About Mask Types and available properties, see Mask Types section for more info.
Manage Objects
In the Data Mask Config dialog, Objects List shows the currently selected Objects.
Add Objects
- Click on
+icon in the data grid toolbar to select new Object. It would show below dialog
- Note: that
Select Objectsdialog shows only Standard Data, Custom Data, Custom Settings objects - Select one or more objects you want to Mask and click
Ok - It should add selected objects to Objects List grid.
Delete Objects
If you don't want to mask one or more objects, select and click on Trash icon to be delete them. Once deleted,
they will be removed from the list and will not be masked.
Inactivate Objects
If you want to temporarily not mask one or more objects (as part of testing), you can inactivate them. Click on the
checkbox in the "Active" column in the Objects List to inactivate. In the sample picture below, Account object is
Inactivated
but Contact is activated.

Configure Object
To configure an object, select that object. To select an object, you can click on the checkbox in left more column of that row or just click on the row somewhere. If you have selected more than one object, then object/fields configuration will be hidden. In that case, unselect other objects.
Once an object is selected, right side panel shows the various Object Options and bottom panel shows the fields list. See those sections for more info.
Object Options
These options are applicable for currently selected Object in Objects List. If no or more than one Object is selected,
then these options will
not be shown.
| Field | Type | Default | Description |
|---|---|---|---|
| Bulk Api | Picklist | Default | Controls if Bulk Api is enabled or not. If it is Default, then global settings will be applied. |
| Bulk Api Threshold | Numberr | 10000 | Indicates number of records after which bulk api should be used. For ex., if it is 10000, then bulk api will be used if system needs to process 10000 or more records in in a batch. |
| Bulk Api Mode | Picklist | Parallel | If bulk api needs to be used, indicates how those records are to be processed by Salesforce. |
| Write Batch Size | Number | 200 | Number of records to include in one batch api save request. This is applicable only for Batch Api |
| Split Range Mins | Number | 5040 | See below section Split Range Mins for more info |
| Start Masking From | DateTime | See below section Start From At for more info | |
| Disable Automations | Picklist | Default | See below section Disable Automations for more info |
Split Range Mins
Realtask masks records in batches called Split Ranges. It splits the duration of dataset based on the CreatedDate into
batch of split ranges and processes
each range at a time serially. This helps to avoid SOQL query time-outs and helps recover from errors as masking
re-starts from next split range. This option
controls how big those split ranges are in minutes. It defaults to 1 week (5040 mins) but if object doesn't have lots of
records or has much more records,
you can either increase or decrease the range size.
Start From At
If you want to start masking records from a particular datetime (based on CreatedDate), select the date/time. Note that
if Masking Dataset Mode is Incremental,
then Realtask will use later of this date or Masked Till date.
Mask Dataset Mode
Mask Dataset Mode indicates which records are considered as the source for masking. It can be either Incremental
or Full.
Incremental
If incremental, mask process maintains the last CreatedDate till when masking has been completed, and it continues to
masking from that date onwards. This is great to
process whole org (in case of post-refresh activities) as when you re-run to recover from errors, it will continue from
where it left off.
Full
If it is Full, then mask process always fetches all records irrespective of if some of those records are already
processed.
Create Status File For
This option indicates when to create status file.
Success/Errors: Status file is created for all records, both success and error records. Keep in mind that if you are masking millions of records, then this may not be best option as it can create status file upto few gbs.
Errors: Status file is created only when a record are errored with that error details. This is the default and recommended setting.
None: Status file is not created. If there are any errors, you will get only the count of errors but not error details.
Manage Fields
Fields List panel allows you to configure which fields are queried and which fields are masked for currently selected
object.
If no object is selected, then fields panel would show message Select an Object to manage its Mask fields. To manage,
select an object from Objects List panel.
Fields to Mask
Fields to Mask setting controls which fields are masked for selected object, as follows.
- Specified: Realtask will include only the fields specified in the Fields List to be queried and masked.
- All: Realtask will include all updatable fields of current object with configuration for each field is overridden with what is specified in the Fields List. If field is not specified in the Fields List, then default masking options will be applied based on the Global Settings
Fields List
When an object is selected, all specified field will be displayed in the Fields List. Select one of the field to manage its configuration.
Add Fields
To add new fields,
- Click on the
+icon the Fields List grid toolbar. - It should bring up below dialog which allows you select one or more fields.
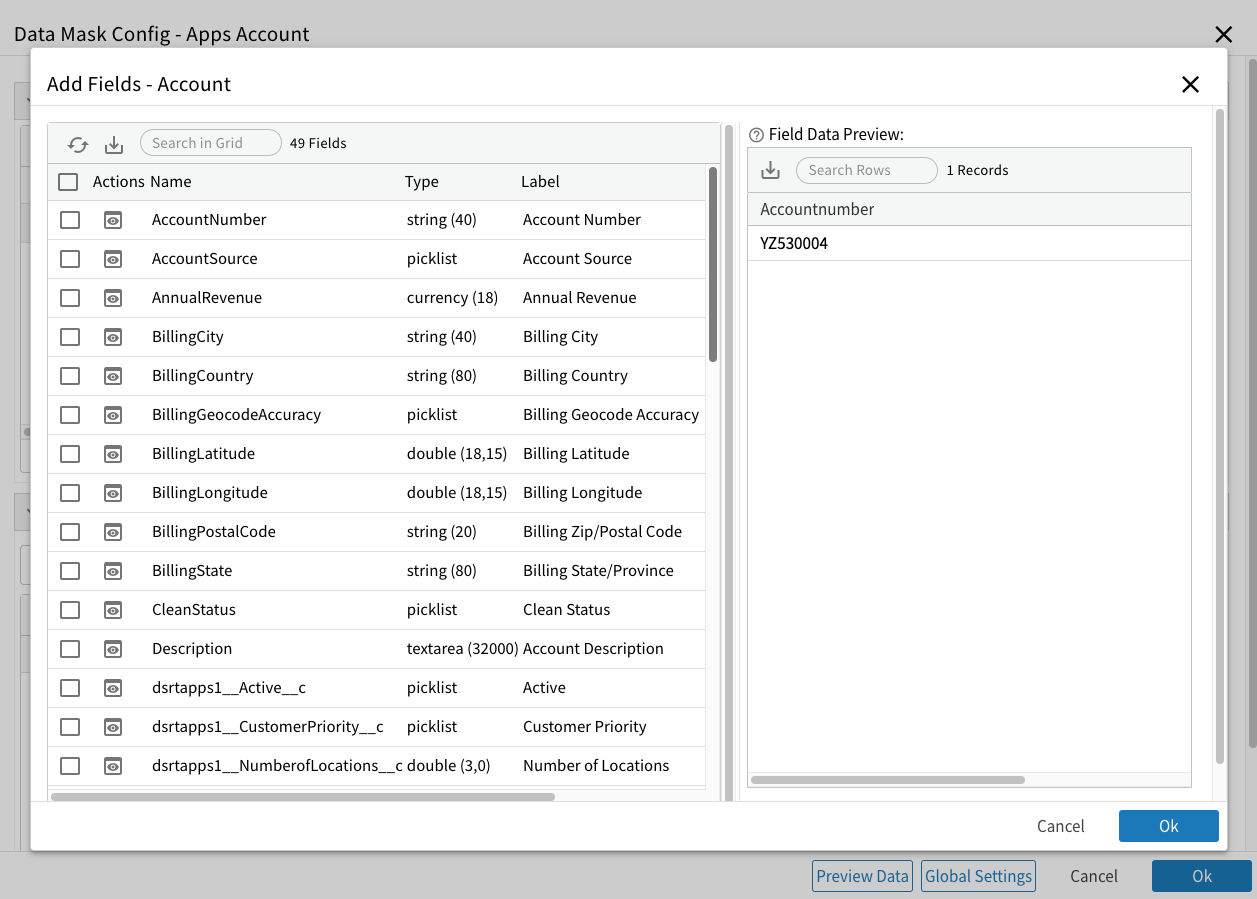
- Click on the
 icon to show some values for selected field. Note that long-text
area fields cannot be filtered to exclude
icon to show some values for selected field. Note that long-text
area fields cannot be filtered to exclude nullvalues so system will fetch some random 100 records and hence some of them may be null. For others, it will fetch non-null values. - Select one or more Fields and click
Ok
Selected fields should be added to Fields List. Now select any one of those fields to configure its properties.
Delete Fields
To delete one or more fields, select them using checkbox in left-most column and click on Trash icon. Once deleted,
fields will be removed from the list. If Fields to Mask is set to All then
those fields will still be masked but using Field Type default settings.
Activate/Inactivate Fields
If you want to keep the fields in the list but want to exclude them temporarily from masking process, then inactivate
them. To Inactivate, click on the checkbox in Active column in the Fields list.
To Activate, check those checkboxes.
Configure Field
Select a field to configure its masking properties which will be shown in right panel under Mask Options

See Mask Types for various Mask Type and their properties. Click on Data Mask Playground to open mask playground where you can try out various mask options, its properties and how they mask the data.
Mask Types
Masking can be configured in a couple of places viz., Fields List and Field Type Defaults. In such places, system
allows you to pick Mask Type and configure its properties. This section documents various Mask Types available in the
system and it's properties.
Mask Type - Default
Default mask type means, use the applicable default based on the field type for that field in following order.
- Field Type Defaults (defined in Edit Field Type Defaults section)
- System Defaults (defined in the application)
Mask Type - No Mask
If a field is defined as No Mask, as name indicates, no masking will be applied. This is useful to include the field
so that
its data can be fetched and used to mask other fields (in case of Binary masking or Formulas) but field itself should
not be masked.
If you select No Mask for a field type, then there is no default masking for that field type. This is useful to skip
masking all fields of particular type. For ex., leave all number fields as unmasked.
Mask Type - Fake Data
This mask type allows you to generate realistic looking various pieces of data.
| Fake Type | Description |
|---|---|
| Address - Postal Code | |
| Address - City | |
| Address - Street | |
| Address - County | |
| Address - Country Name | |
| Address - Country ISO2 Code | |
| Address - State Name | |
| Address - State Code | |
| Address - Latitude | |
| Address - Longitude | |
| Time Zone | |
| Commerce - Product Name | |
| Commerce - Product Description | |
| Company - Name | |
| Company - Url | |
| Date - Past | |
| Date - Future | |
| Date - Between | |
| Date - Recent | |
| DateTime - Past | |
| DateTime - Future | |
| DateTime - Between | |
| DateTime - Recent | |
| Finance - Account | |
| Finance - Account Name | |
| Finance - Account Number | |
| Finance - Amount | |
| Finance - Transaction Type | |
| Finance - Currency Code | |
| Finance - Currency Name | |
| Finance - Currency Symbol | |
| Finance - Credit Card Number | |
| Finance - Credit Card CVV | |
| Internet - Email | |
| Internet - Url | |
| Internet - Domain Name | |
| Internet - Domain Suffix | |
| Internet - Domain Word | |
| Internet - ip | |
| Internet - ipv6 | |
| Lorem - Words | |
| Lorem - Sentences | |
| Lorem - Paragraphs | |
| Person - FirstName | |
| Person - LastName | |
| Person - FindName | |
| Person - JobTitle | |
| Person - Gender | |
| Person - Prefix | |
| Person - Suffix | |
| Person - JobDescriptor | |
| Person - JobArea | |
| Person - JobType | |
| Phone - Number | |
| Phone - NumberFormat | |
| Phone - Formats | |
| Random - Number | |
| Random - Float | |
| Random - uuid | |
| Random - Boolean | |
| Random - Words | |
| Random - Locale | |
| Random - Alpha | |
| Random - AlphaNumeric |
Mask Type - Email Skew
Used to change part of email value. This applies only if there is an existing value. If incoming value is blank, then output will be blank too.
Local Part
Local part of an email is value before @ char. Available options to change this part are,
- Retain: It will be left as is
- Random: Some random value will be generated
- Char Transpose: Transposes the existing chars
Domain Part
Domain part of an email is value after @. Available options to change this part are,
- Retain: It will be left as is
- Random: Some random value will be generated
- Fixed: Sets to specified value in
Domain Valueinput field - Char Transpose: Transposes the existing chars
Remove Invalid Chars Sometimes email can contain invalid chars in them and this causes problems while saving as Salesforce will error out. Checking this option will clean up and removes invalid chars before updating
Mask Type - File Name Skew
Allows you to modify parts of a file name. Used to change the file name fields like Attachment.Name
or ContentVersion.PathOnClient etc.,
This mask type applies only if there is an existing value. If incoming value is blank, then output will be blank too.
Name Part
Name part of a file name is value before last . char. If there is no . then whole string is considered as name part.
Available options to change this part are,
- Retain: It will be left as is
- Char Transpose: Transposes the existing chars
Extn Part
Extn (Extension) part of a file name is value after last .. If there is no . char in the value, then extn part will
be blank. Available options to change this part are,
- Retain: It will be left as is
- Fixed: Sets to specified value in
Domain Valueinput field - Char Transpose: Transposes the existing chars
Mask Type - Picklist Skew
This mask type is applicable for fields of type Picklist/Multipicklist. When run, this will randomly produces one of the valid picklist values of that field.
Mask Type - Replace First
This mask type allows you to replace first n number of chars in input string with particular mask chars and leaves the
rest as is. This mask type is great to
skew phone number by replacing first 7 chars with x and and leaving the last 4 chars as is.
Char Count Number of chars in incoming string to replace. If not specified, then defaults to all.
Match Chars Char dataset which should be considered. If there is a char which is not in this input string, then it is left as is. Defaults to alphanumeric chars.
Action What do with matched chars.
- Char Transpose: Char transpose the matching chars
- Replace: Replace with specified chars (default)
Replace Chars If we need to replace, specify the chars to replace with. Defaults to 'x'
Mask Type - Nullify
This mask type blanks out the input.
Mask Type - Char Transpose
This mask type replaces all alphanumeric chars with random char from its char pool. For ex., digits are replaced with random digits, lower case chars are replaced with random lowercase char and uppercase chars are replaced with random uppercase chars. It leaves out the non-alphanumeric chars as is.
Mask Type - Values
This mask type takes list of values and produces one value each time it is used either in random or in specified order.
List of Values Enter the list of values as one value per line. If no values are specified, it produces blank value.
Match Type How values should be produced/matched.
- Specified Order: Values are produced in the specified order and when it reaches end, it starts from beginning again.
- Random: Random value from list of values is produced
Mask Type - Formula
This is an advanced mask type which gives you full control on how incoming data needs to be changed. You can use any of
the available formula functions and record values to produce new value.
If you want to refer to a field, but you do not want to mask that field, add that field and set the mask type
as No Mask so that field is queried and used in other field formulas.
Data Mask Playground
We have built a Data Mask Playground which allows you to
experiment with various mask types. It can also be accessed by clicking on the Data Mask Playground link next to Mask
Type combobox.
Data Mask Preview
Data Mask Preview allows you to preview how masking works as you are configuring it. Along with Data Mask Playground, preview helps you confidently configure the data masking per your business needs.
To preview,
- Select single Object from Objects list. If you select none or more than one, then Fields list, Preview button will be disabled.
- Click on
Preview Databutton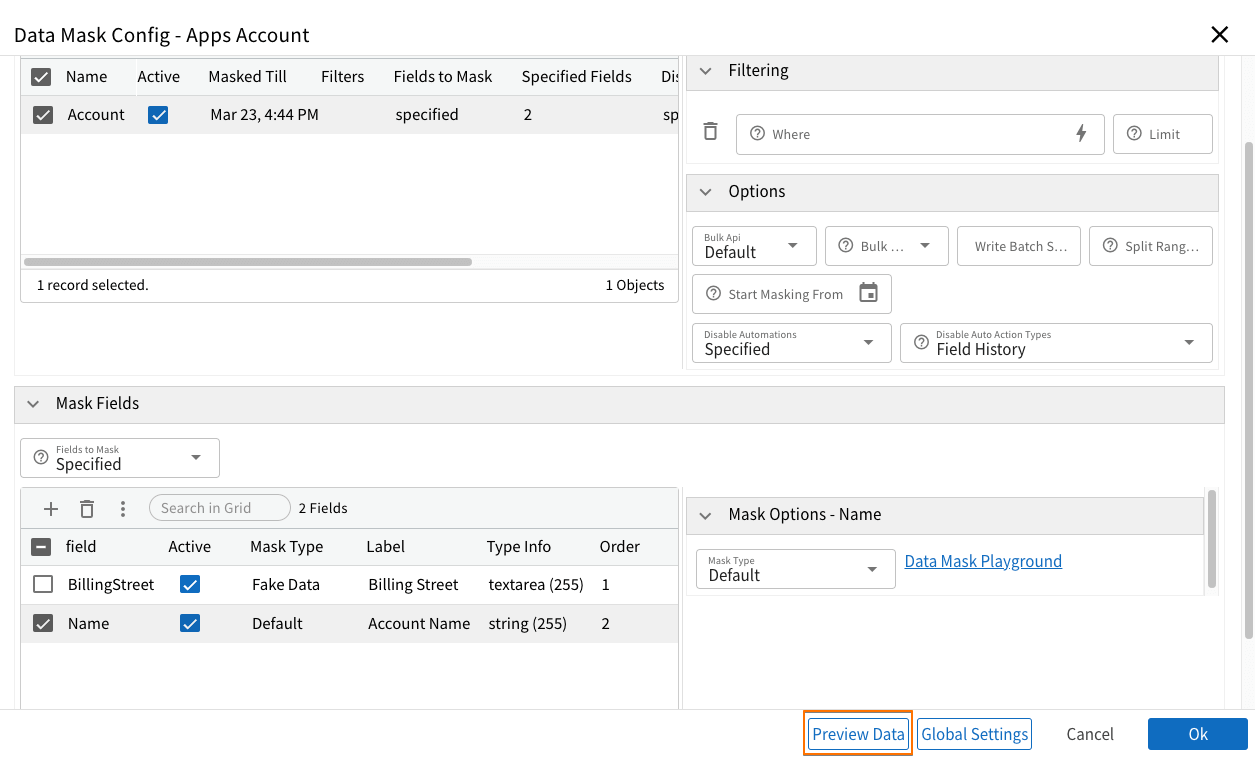
- It should bring up below dialog showing the preview
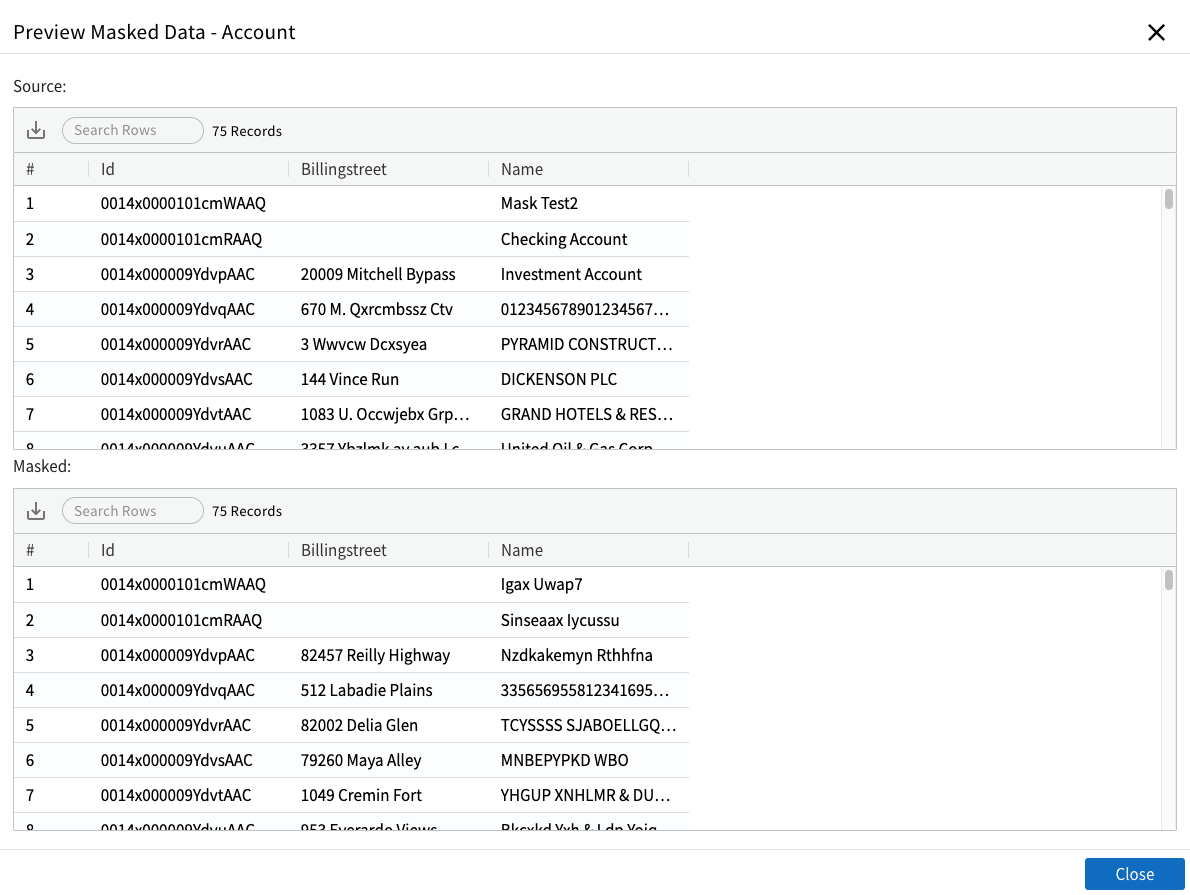
- Top grid named
Source:shows the records as they exist in the Org - Bottom grid named
Masked:shows what records looks like after they are masked
Few things to keep in mind.
- Preview shows maximum 100 records
- Record selection logic applies the filtering logic you specified in the Object options
Execution
To execute a Task, execute the Job to which this task belongs to. See Job Execution for more info on Job execution.
Mask Runs
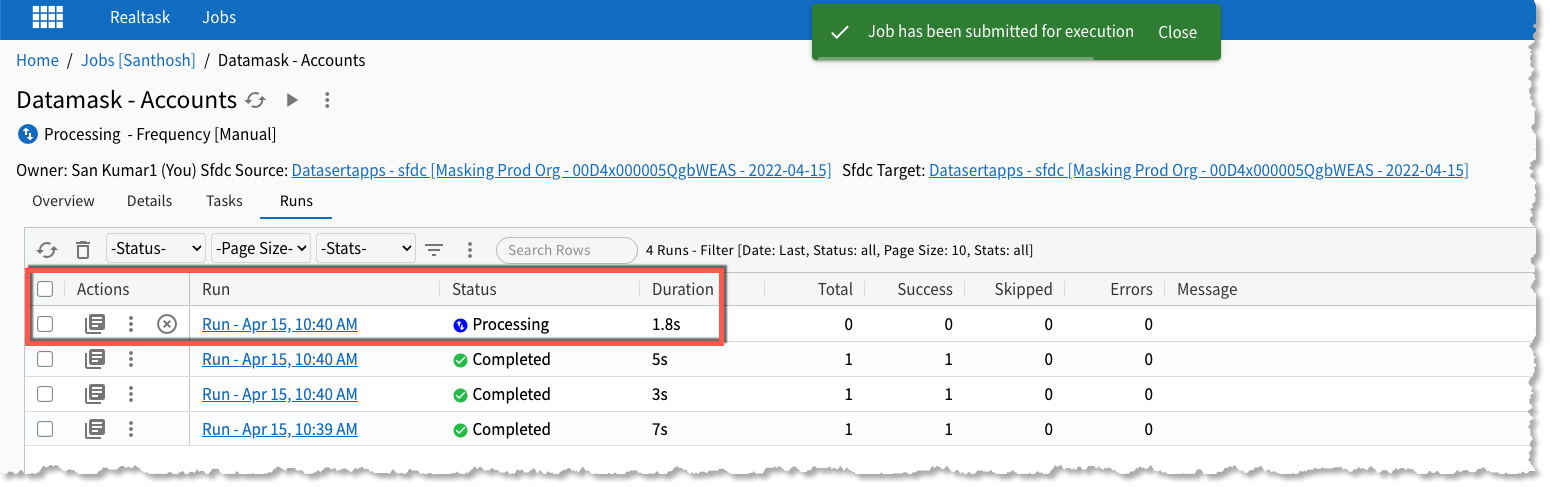
To see the Mask progress or completion details, follow these steps.
-
Once Job started the execution, it would create a Run record. You can see the Run records from Runs tab in Job page as shown below. If you don't see the Run, click on Refresh icon.
-
Click on the Run link which should bring into Run page. In Run page click on the
View Additional Infoicon. If you have multiple tasks as part of the Job, make sure you click on the icon associated with the Mask task you are interested in.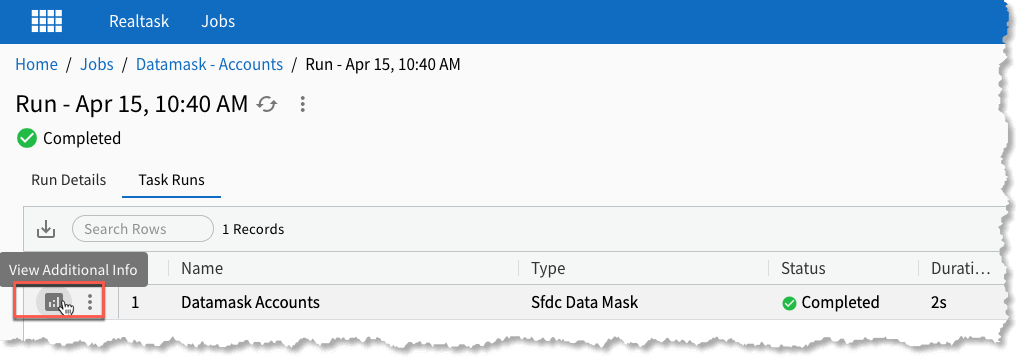
-
It should open the Mask Run Details dialog which shows complete information about the Masking. See next section for more details.
Mask Run Details
Data Mask Run Details dialog shows current status of Mask process
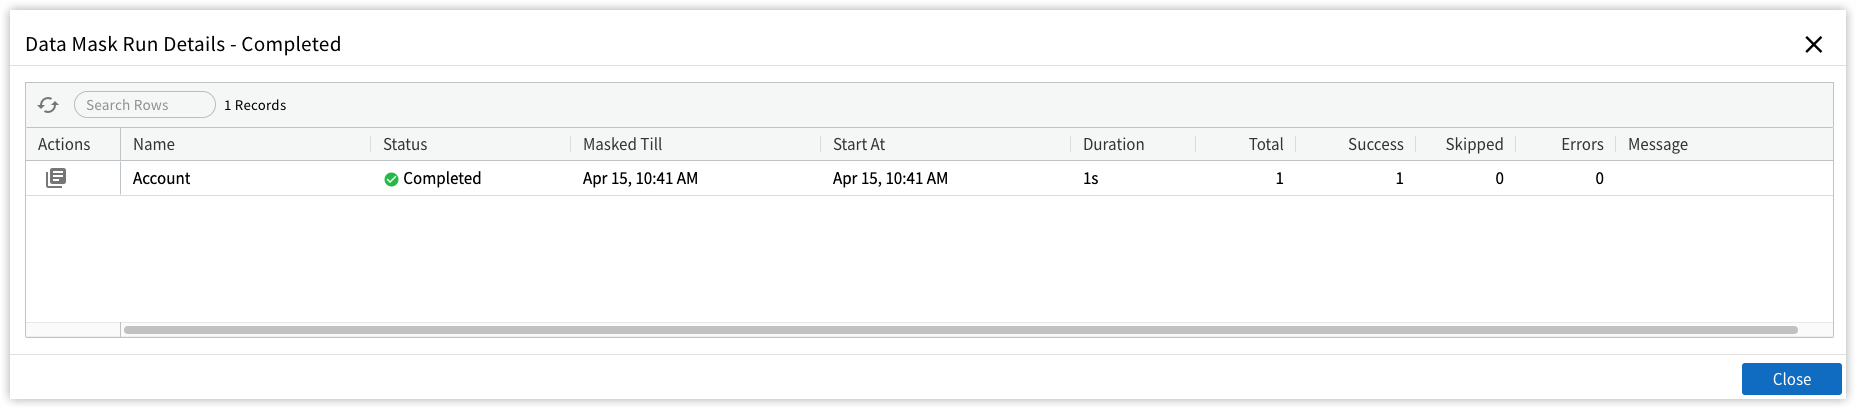
Data grid shows one row each Object configured in the Mask config. List of columns in data grid are as follows.
| Column | Description |
|---|---|
| Actions | If there are any files associated with that Object, then Files icon will be shown. Click on the icon to show files dialog. |
| Name | Name of the Object being masked |
| Status | Current status of the mask process for that Object. |
| Masked Till | Realtask masks the records in batches. At the end of each batch, it makes a note of batch end-date and that date is shown here. If mask type is incremental, next time mask is run, it will mask records from this date onwards. |
| Start At | When masking started for this Object |
| Duration | How long the mask process took |
| Total | Total records masked |
| Success | Number of records successfully masked |
| Skipped | Number of records skipped |
| Errors | Number of records errored. If this column shows any number, click on the Files icon to view status files which should give details as to why records failed. |
| Message | Any message associated with this Object |