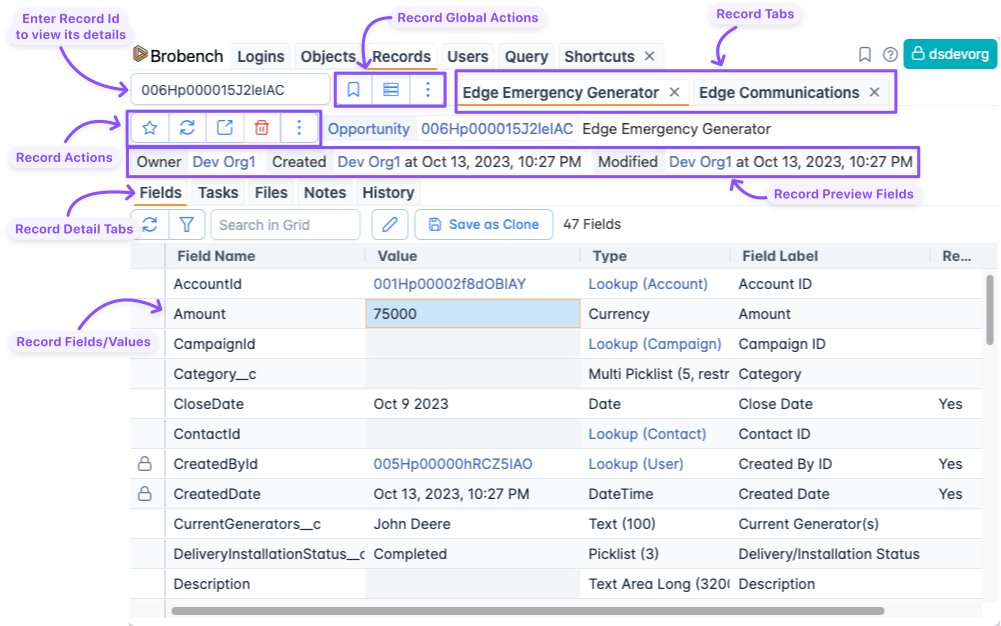
Records

Record module allows you to view complete details of a Salesforce record, edit its fields, and view related details with ease. Here is the overview of Records Module UI Layout.

Viewing Records

Enter any record id that you want to view its details. Record if valid, will be opened in a new tab.

Record Header

For each Record, the header shows some high-level information about the Record as outlined below. This gives straight away some basic information about the Record without having to click anything else.

Record Details

Record Details section shows all fields of the record with its label, type and access information. Filter fields by entering the search term in the Search Input box.

Edit Record

If you want to make some quick changes, click on the Pencil icon in the Record Toolbar to enter in to Edit mode. Then actions changes to show Cancel and Save buttons. Now click the field you want to modify an Input box will appear whose values you can update.

Once you update, click on another part of the screen to accept the updated value. After that, updated fields background color will change to Orange to indicate changed fields.

To save the Record, click on the Save button, which will prompt you to confirm the changes to be Saved. Upon confirmation, the record in Sfdc will be updated and the screen will refresh with the latest record from Sfdc.

warning

When you are trying to interact in Popup Mode, the screen will disappear if you click on any other part of the Browser or focus out of the Popup dialog. So if you want to focus out of browser, make sure you are in Full Page view and then edit the record.

Clone Record

To clone the current record, click on the Clone button in the toolbar. Then the screen will enter Clone Edit Mode. In this mode, you can make changes to any Creatable fields and then click on 'Save Clone' button to save the record.

Upon Save, the screen will refresh with newly created record.

info

In clone mode, Screen will highlight the changes you have made over base record but it will still save all fields.

Delete Record

To delete the current record, click on the Trash icon in the toolbar. The App will ask you to confirm the deletion and upon confirmation, it will delete the record. If deletion is successful, the current record will be cleared and an empty screen will be shown.

Record Tracking

When you open Brobench in In-page Popup, it tracks the current record that is opened on the page, and it shows the details of that record immediately in a new tab. This record tracking is not available when app opened in full page mode.

Record Detail Tabs

When you open a record, it shows a set of tabs with various details of that record like Fields, History etc., Brobench has a list of standard tabs that it shows but allows you to define your own custom detail tabs so you can have the right information in your hands for quick analysis

Standard Record Detail Tabs

The following table lists various tabs and when they are available

NameConditionDescription
FieldsAlways ShownShows all fields of the record
<related list>When you are viewing the a Related List in UIWhen you navigate to a Record List page of a record, that Related list is automatically shown
HistoryNon-Setup ObjectsShows record history
TasksNon-Setup ObjectsShows the list of tasks related to this record
NotesNon-Setup ObjectsShows all notes related to this record
FilesNon-Setup ObjectsShows Attachments and Content Files related to record
PermsetsUserShows permsets assigned to current User
HierarchyHas at least one Hierarchy FieldShows the Record hierarchy as per the selected field
LoginsUserShows the Login history for the User
Setup AuditUserShows the Setup Audit for the User

Custom Record Detail Tabs

It is possible to define your Record Detail tab, which can show Record's Child Field or Query data by that record id.

Login As User

App allows you to do Login As other user. These actions are shown in various places including in Search, Record More Actions Menu, Record Preview and Global Menu. Functionality works the same across all places, hence documenting here in one place.

Here are various Record Actions menu from various places, which has Login As actions.

Search

Record Page

Global Menu

OptionDescription
Login As or Click on IconWhen you click on this, app will try to login as that user in current tab. Note that your current session will change to that of that user. Due to how Lightning works, when you log out of that user you logged into, you will be asking to login again.
Login as in IncognitoApp tries to login as in Incognito window.
View Login as UrlThis option creates the Login as url for that user and shows the Url in a dialog. Once it is shown you can right click on it, and select different browser to login as.
Copy Login as UrlThis option creates the Login as url for that user and copies into clipboard. You can paste the url into different browser to login as that user.