Query Overview
The Query module of Brobench provides highly sought-after capabilities to help with writing queries, view results, create favorite queries, and recall query history for easy re-execution.
Overview
There are a lot of things in the Query module, and the screenshot below highlights many important aspects. Each of these features is explored further in the sections below.

Basic Usage
The most basic usage is to author a query and execute it. To do that go to Query Editor, write or paste the query, and
click the Execute button. Once executed, results will be shown in the section below. At this time, Query Results don't
allow you to edit the records but that capability will be added in future versions.
Once results are shown, you can explore the results. Search for a particular record by entering a search term
in the Search in Grid input box. If there are a lot of fields, you can filter fields by entering a search term
in the Filter Fields input box. You can resize the columns by dragging the end of fields and dragging to make it wider or
narrower. You can re-arrange fields if you want to see specific fields together.
If your query matched more records than shown in the Grid, Fetch Next Batch button would be enabled. Clicking on that
button, the app will fetch the next batch of records.
If you want to hide some fields based on some criteria, click on the Filter fields by Criteria button where you can
choose the type of fields to hide.
Query Toolbar
Query Toolbar is shown at the top of the Query Editor, and it provides various actions that you can perform.
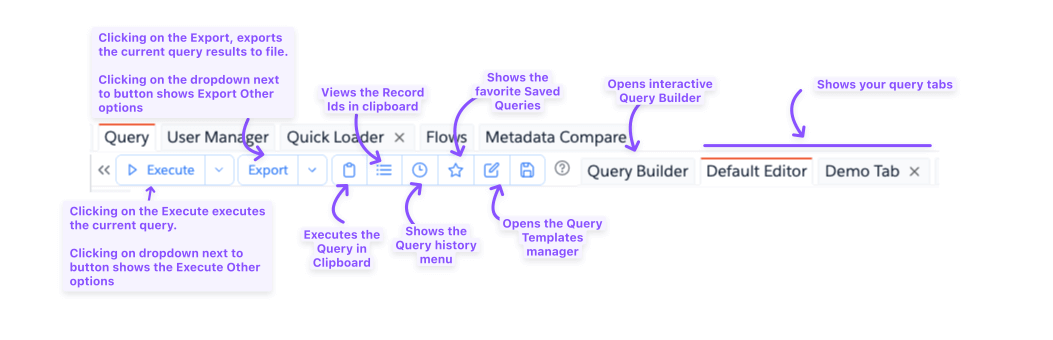
Execute Query
There are three ways to execute a query that you have authored.
- Click on the
Executebutton in Query Editor toolbar - Right-click on the query text and select
Executemenu item - Press keyboard shortcut
Cmd+Enter/Ctrl+Enter
The query to be executed is picked in this order
- If you have selected any part of the query, only that selected text will be executed.
- If you haven't selected any text, then the paragraph around the current line will be used. The paragraph is identified by blank line on above and/or below current line. If the current line is blank line, then the paragraph below current line is executed. If the current line is blank and there is nothing else after that line, then nothing will be auto selected.
When you execute a query, the result tab will open and results or errors will be shown. See Query Results for more information on how to navigate around the results.
Query Results
Your execution results will be shown in the Query Results tab. The data is shown in a Data Grid
- You can also choose to edit your data by entering edit mode. You can do this by clicking on the
Editbutton in the toolbar.- In
Editmode, the grid becomes editable :- You can make changes to the data by either entering the updated values in the grid or by clicking on the
Pencilicon in the toolbar, this would bring up a dialog to make editing easier. The Updated fields will be highlighted and the_Changecolumn will reflect this corresponding to the updated record - You can also flag a record to be
Deletedby clicking on theTrashicon in the toolbar. This will be reflected by the_Changecolumn corresponding to the record - You can choose to revert the changes by clicking on the
Undobutton in the toolbar. This will revert the changes made to the record You can either revert selected updated fields or revert all changes made. - After making the changes to the data, you can save the changes by clicking on the
Savebutton in the toolbar. If there are any errors that occurred during the update, they will be shown in the_Errorcolumn corresponding to the record Hover over the_Errorcolumn cell to see the error message.
- You can make changes to the data by either entering the updated values in the grid or by clicking on the
- In
- You also have the ability to visualize data graphically. This can be done by clicking on the
Visualizebutton in the toolbar. This will bring up a dialog where you can add multiple charts / graphs. To learn more refer Charts
Query Results
Your execution results will be shown in the Query Results tab. The data is shown in a Data Grid
- You can also choose to edit your data by entering edit mode. You can do this by clicking on the
Editbutton in the toolbar.- In
Editmode, the grid becomes editable :- You can make changes to the data by either entering the updated values in the grid or by clicking on the
Pencilicon in the toolbar, this would bring up a dialog to make editing easier. The Updated fields will be highlighted and the_Changecolumn will reflect this corresponding to the updated record - You can also flag a record to be
Deletedby clicking on theTrashicon in the toolbar. This will be reflected by the_Changecolumn corresponding to the record - You can choose to revert the changes by clicking on the
Undobutton in the toolbar. This will revert the changes made to the record You can either revert selected updated fields or revert all changes made. - After making the changes to the data, you can save the changes by clicking on the
Savebutton in the toolbar. If there are any errors that occured during the update, they will be shown in the_Errorcolumn corresponding to the record Hover over the_Errorcolumn cell to see the error message.
- You can make changes to the data by either entering the updated values in the grid or by clicking on the
- In
- You also have the ability to visualize data graphically. This can be done by clicking on the
Visualizebutton in the toolbar. This will bring up a dialog where you can add multiple charts / graphs. To learn more refer Charts
Query Types
Query Editor supports executing a different type of queries, the primary one being SOQL query. It also supports SOSL Queries. More will be added in the future.
SOSL Queries
Query editor supports authoring SOSL Queries and executing them as you would a SOQL query. Type up the SOSL Query and execute it.
Keep these things in mind when you are executing SOSL.
- While Query editor supports all aspects of SOSL query authorizing including
With SnippetsandWith Highlights, the results shown are not highlighted in the grid. This is due to how the data grid rendering works and data as returned from Salesforce.
Here is an example of how to execute SOSL query, view results and modify them.
SOSL Query Auto-Complete
SOSL Query is used to search data in Salesforce using various conditions.
Query Editor supports SOSL Queries with auto-completion for Objects and Fields, and all clauses of SOSL Queries. If auto-complete is not working in particular SOSL clause, please create a bug and will address it.
SOSL Query Pre-processing
If you include an object in the query but do not specify specific fields, then app automatically includes Record Preview Fields for that object.
For ex., if you execute query
find {test} returning Account,
it actually runs this query behind the scene (list of fields may vary based on Record Preview Fields configuration)
find {test} returning Account (Id, Name, CreatedById, CreatedBy.Name, CreatedDate, LastModifiedById, LastModifiedBy.Name, LastModifiedDate).
This enables you to see more context around matched records than just the Id that Salesforce returns by default.
If you do include any field in that object, then Preview Fields are not added. For ex., if you run
find {test} returning Account (Id), then that query is executed as is.
Viewing SOSL Result
When you execute a SOSL Query, if there are multiple objects returned from Salesforce, then a sub-tab is shown for each of the results. Each tab shows matched records for that single Object as shown in the Tab title.
Each tab is a fully functional Data grid that you can search in grid, filter columns, edit/save, and export as usual.
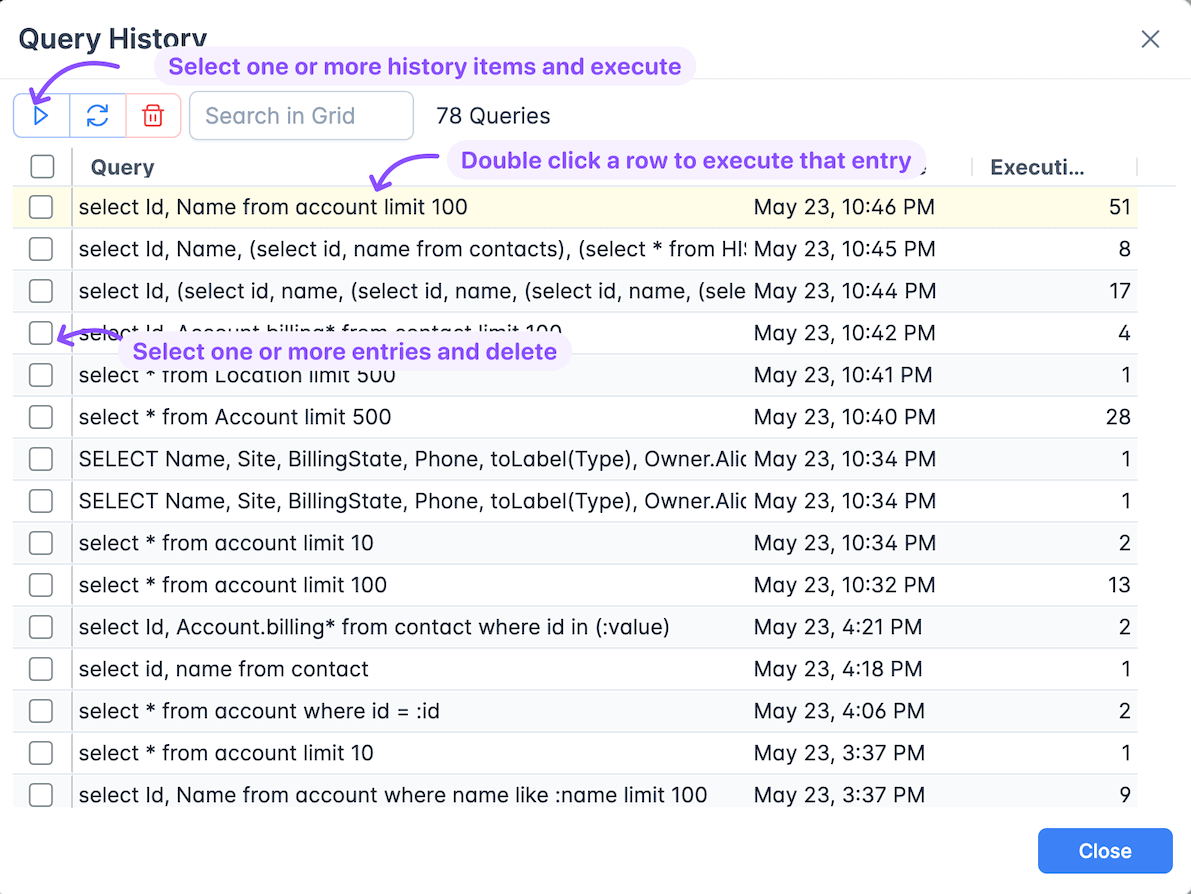
Query History
Every time a query is executed, it is added to Query History MRU (most recently used) lis along with execution time and execution count. You can view this history by clicking on the 'Click' icon in the Query Editor toolbar.
Visualizing Results
After you execute a query, you can visualize the results graphically to provide a constrast / trend / relationship between queried data. You can do this using the Visualize button in the Query Results tab toolbar.