Bulk Create Fields
The Create Fields feature allows you to efficiently create multiple custom fields in bulk with comprehensive configuration options. This powerful tool enables you to define field properties, configure access permissions for both profiles and permission sets, and speed up the field creation process with access presets to assign pre-configured access permissions with the click of a button.
Main Dialog
To access this feature, navigate to the Objects module, select an object, and click the Plus icon in the Fields tab toolbar. When you click this button, the Create Fields dialog will open as shown below.
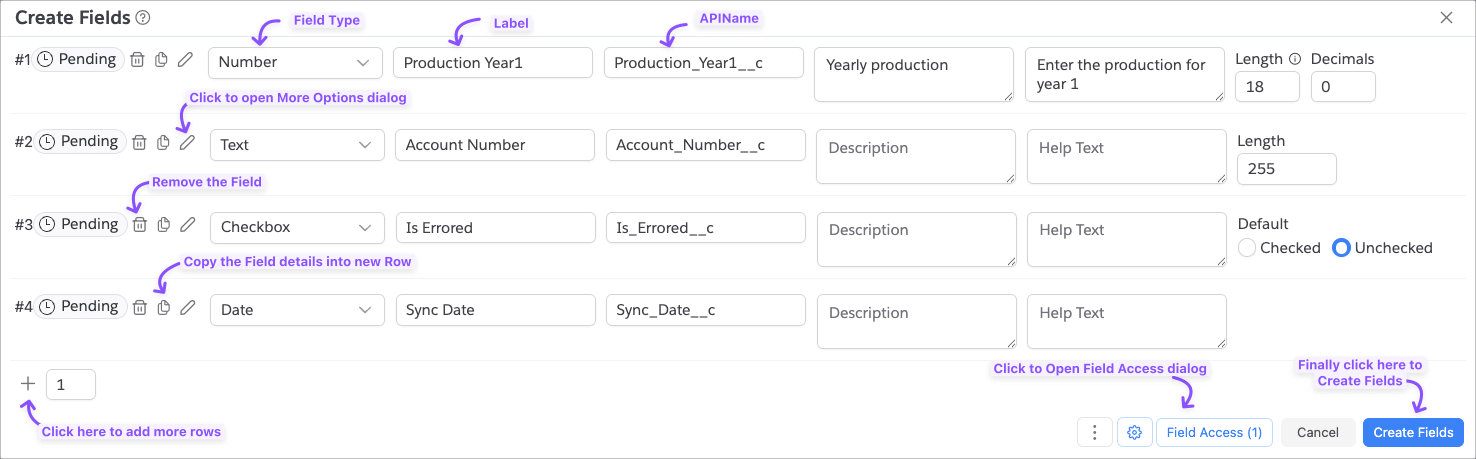
Field Row Columns
Here are various columns in the main dialog.
| Column | Description |
|---|---|
| Actions | Shows various actions that acts on each Field row. |
| Type | Field data type (Text, Number, Currency, etc.) |
| Label | Display name for the field |
| Name | API name, auto-generated from label but you can change it too. |
| Description | Field description for documentation |
| Help Text | Inline help text shown to users |
| Properties | Type-specific configuration (length, decimals, etc.) |
Add More Rows
When the main dialog is open, it starts with a single field row. If you’re looking to create more fields, click on the
+ icon at the bottom-left of the Dialog. You can also enter a number in the input field to add multiple rows at once.
While creating fields, the app will ignore the rows that are missing the label/api name.
Field Naming Convention
The app defaults to Underscore Case convention for field API names (For example, Account_Number__c). You can change
this to
Pascal Case (For example, AccountNumber__c) in the setting. To access settings, click on the Gear icon in the
bottom-right of the main dialog.

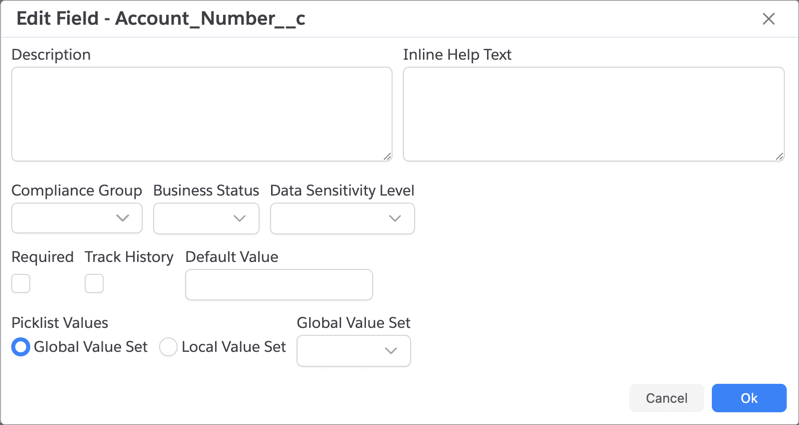
More Options Dialog
Each row in the main interface allows you to specify only basic field properties. To configure additional properties for each field, click on the Pencil icon in the field you want to edit. This is especially useful for Picklist fields or if you want to configure field metadata like Owner, Compliance, etc.,
Field Access
Field Access button opens a dialog where you can specify the access. See Field Access for how to
use that dialog and specify the access.
- All Fields gets the same access specified in the Field Access. If you want different access for different fields, you will have to do that in different attempts.
Importing Fields
If you’re creating a lot of fields, it can be painful to keep clicking and entering the field details. To make it easier, you can prepare a CSV file with the field details and import it.
To start the import process, click on the More Actions menu at the bottom-right of the main dialog as shown below.

The app will show the dialog below where you can copy/paste the CSV content. Your CSV must adhere to the same header names that are shown by default. You can use that as a template to create your import file.
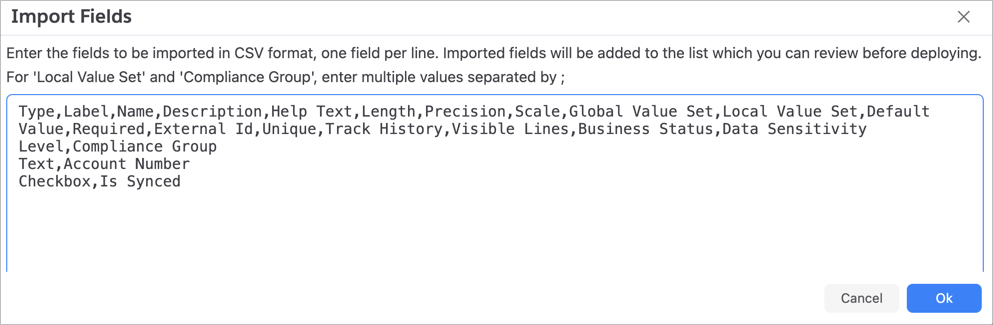
Once you enter the details, click Ok to import the fields. Imported fields will be added to the list which you can
review and/or customize.
- Only Type and Name fields are required. All other details are optional, so you can leave them blank or you can completely remove those fields.
- Field Type values must be one of the values shown in the main dialog
- For
Local Value Set(used for Picklist and Multi Picklist Fields) andCompliance Groupfields, enter the multiple values separated by;(semicolon). This is similar to how multi-picklist values are formatted in Salesforce.
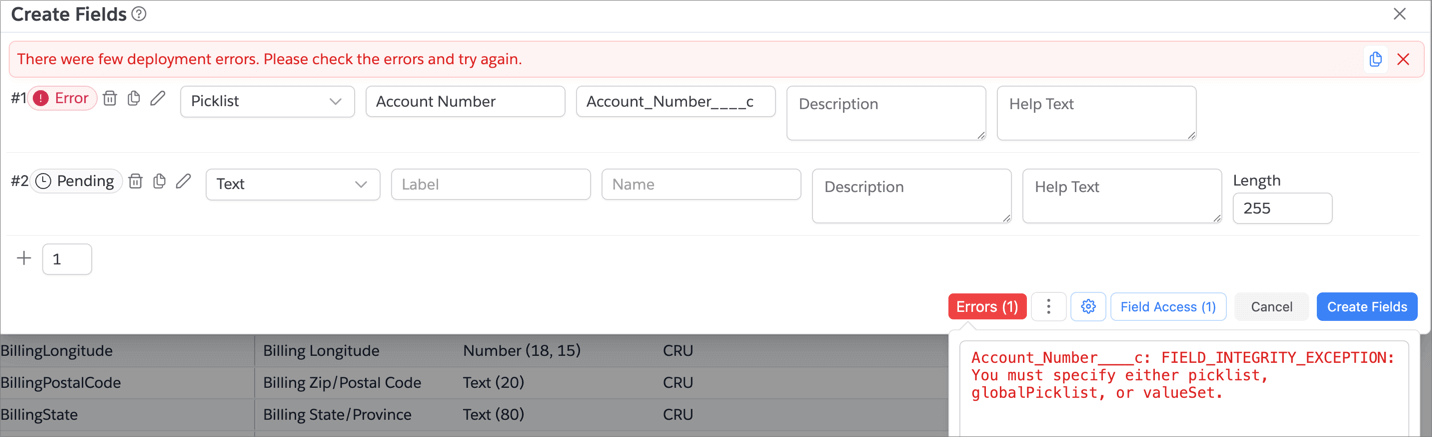
Deploying Fields
Once you’ve configured all the fields and their access permissions, click on the Create Fields button to start
deploying the fields. The status field next to each of the Field rows will show the status.
| Status | Description |
|---|---|
| Pending | Field is not deployed yet |
| Error | There is some error in deploying the field |
| Success | Field and its access successfully deployed |
| Access Error | Field is deployed but there are some errors while saving the Field Access configuration |
Errors and Troubleshooting
When there is an error in deploying a field, the status will show Error or Access Error. The app will also show an
Errors button at the bottom that shows all errors when you hover.
Related Features
- Field Access Editor: Shared access editor used by Create, Clone, and Edit Access flows
- Object Details: Understanding object structure
- Fields Tab: Managing existing fields
- Field Analysis: Analyze field usage patterns